Wednesday, November 11, 2020

Security Garments in Blow-in Installation

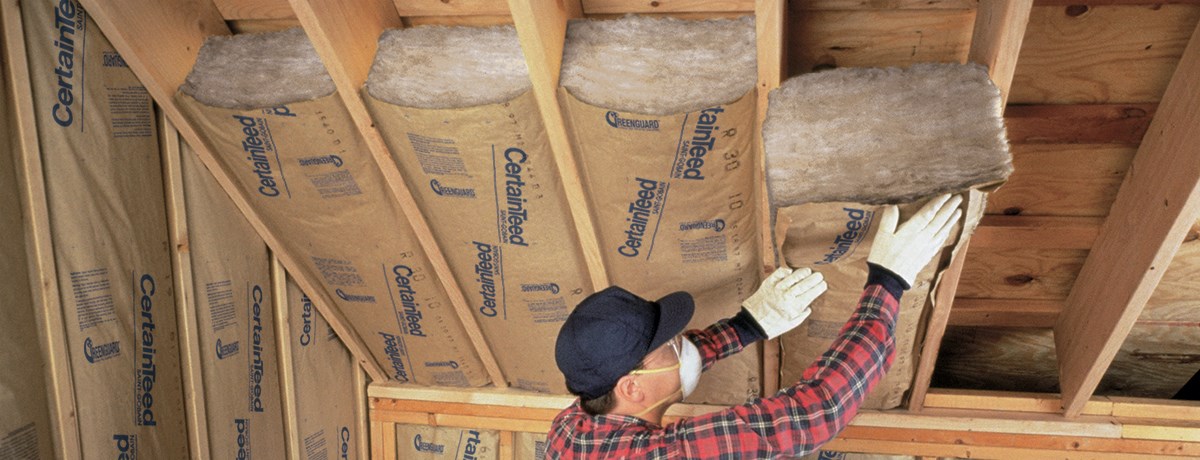
Blow-in insulation is one of the most effective insulation products in the market. One of the many advantages it has is to provide complete coverage of the specific area so that there are no gaps in the insulation and consequently there will be no escape of hot air.

Installing blow-in insulation requires protective gear. It is not as simple as nailing a painting to your living-room wall. If you cannot wear adequate protective gear when installing blow-in insulation, you are risking your health and even the effectiveness of the blow-in insulation installation.

First Things First

Blow-in insulation is one of the best products you can acquire for effective insulation. It is a great product to have if you are planning to prepare your home for the weather changes that come about during the rainy and cold seasons.

It is not something that you can achieve in 1 or 2 hours. Rushing the entire project will only cause the insulation to improperly settle, expand, nor to insulate adequately. In consequence, all the work you would have done by that time will be lost.

Consider how much time you have and can dispose of to set and install the insulation. Also, determine how many rooms or areas are you planning to insulate during that window of time. Do not forget to factor moving things around and any maintenance, repair, or otherwise changes that have to be done to the areas before installing the blow-in insulation.

Ideally, the room where you will install blow-in insulation should be empty and with no need for repairs. If the area is not new, then be sure to check for the status of the installations before commencing the installation of the blow-in insulation.

When you strategize what you need to do and how you are going to be doing, for instance, the moving of furniture and installations off from one area or room to install insulation in it also implies that you will be tired and will need rest. This will add time to the complete installation process.

Another thing to consider is the time you will devote to this project comprehends the base of the room or area in which you will be working. If the plan is to renew, replace, or install insulation in a room that is currently under-use, you will need to ensure that the utilities are working properly. It is a perfect time to check the electrical installation and verify that there is no other utility installed or that any other utilities are also working properly.

You might also want to consider installing any new utilities, commodities, or beautification ornaments. These things add to the time that you will need to allocate in the insulation installation. And on the security gear, you will need to wear it.

Security gear used in these times might differ somewhat or completely from the security gear you should wear when installing insulation. Therefore, it will always be advisable for you to work on total days. For instance, if you are planning to work in a bedroom and:

Consider this amount of time and security gear:

  • Gas installation: one day.
  • Removing of all furniture off the room: One day
  • Electrical utility: lamps and outlet: one day
  • Electrical utility: renew the whole installation: One day
  • Remove existing insulation if damaged: one day
  • Installing blow in insulation: one day
  • Finishing the repair: setting up drywall and painting: two to three days
  • Returning the furniture to the room: One day

One of the biggest problems with homeowners and people who prefer to do things on their own is the belief that they can just work all day and cut the time that takes to do all of these things short by half. While sometimes, this -could be the case, such as when you are installing a new lamp or setting up an outlet; there are things that must take longer. One of such things, for instance, is the renewal of the electrical installation.

Things that take time to do so because it is important to ensure that the installation is fault-proof from the start. When working with gas setups you want and should be made sure that the whole setup is perfect. Gas leaks can lead to explosions, fire, and death.

What About the Security Gear?

As it has been discussed, each one of the previous installations requires a slightly different security gear outfit. While there are people who think that there is no genuine need to wear full protective gear it is important to remember that security gears are there to protect much more than the clothes you are wearing.

Accidents can happen in the blink of an eye, and afterward, things will never be the same. Even a simple broken bone can heal differently and cause problems when the weather changes. So using the proper security attire is important.

Maybe you need to change security outfit items for working on either of the room. For instance, if you are welding you must wear a welding mask which will be unnecessary and wrong to use when you are working with insulation. Keeping the welding mask on will hinder your vision and cause more problems than benefits.

What to Use?

Regardless of what is it you need to work on all the other areas and tasks of the room or area where you will install the blow-in insulation, these are the security gear that you should wear for this task:

  • Disposable clothes.
  • Hard hat or construction helmet
  • Protective eyewear
  • Gloves
  • Mouth mask.

Disposable clothes

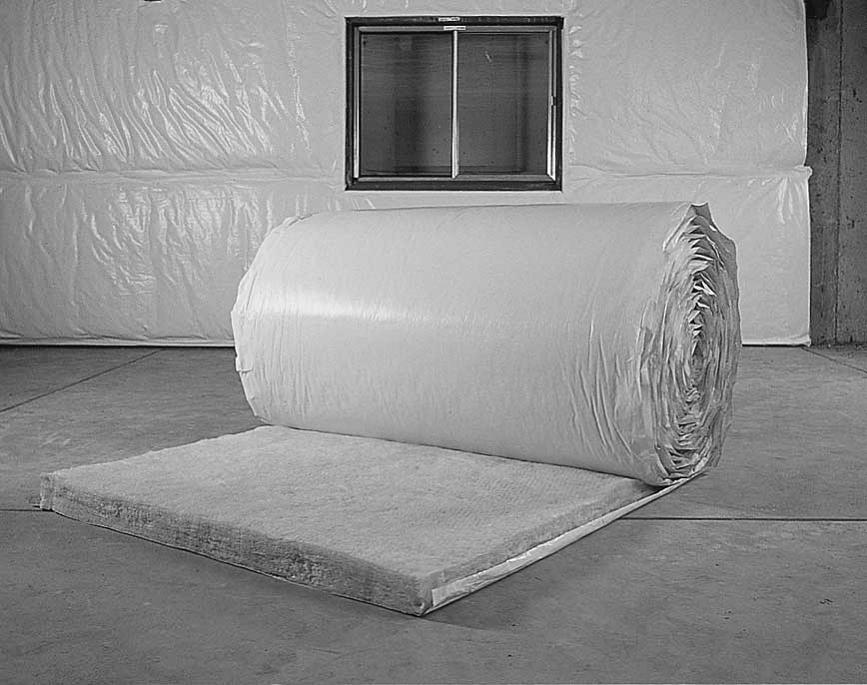
Blow-in insulation is applied with a special machine that turns the material into foam that falls gently into the area that is to be insulated. As foam, it has a soft texture that can be easily removed with little effort when it's freshly installed. As time passes, it hardens, and it needs to be cut to be trimmed. Therefore, if it falls on fabrics, while wet it can be swiped away, the residue will harden on the fabric making it to remove.

However, it is advisable that you find old clothes rather than ragged and tattered. Clothes with holes and tears will make it easy for you to get stuck on nails and crevices and also expose your skin to getting hurt.

Make the same consideration for undergarments, and shoes, and socks.

Hard hat or construction helmet

It might seem that this security item is unnecessary if you are working on an already built house. Yet this is still a necessity, especially if you plan to work on closed and low-ceiling spaces. When you are working, you focus your attention on whatever you are doing, so getting up with impetus and without consideration of where you are is a common mistake.

While this mistake rarely endangers your life, it can cause bleeding and serious damage when you bump your head into a hard surface. Additionally, if you are in a place where maintenance is being done, it is always best to aim for extra caution.

Protective eyewear

Taking care of your eyes is probably one of the most important things that you can and should do when installing blow-in insulation. Wearing protective eyewear will prevent debris from lodging in your eyes and causing serious damage.

Of course, if you are not actively repairing the room where you will install the insulation, there might not be an evident need for the eyewear, but there have been times when flying debris causes lacerations to the eyes and emergency care is called for.

Gloves

Gloves might not seem a good fit as they tend to get in the way of touching and handling things. Many weekend do-it-yourself people state that they prefer to work without gloves, as they can’t grab a proper hold of their tools as they are working.

Mouth mask

This will protect your airways from any debris and small particulates that could wiggle their way to your lungs and cause anything from a mild cough to serious lung-related diseases.

There are many models of mouth masks available in the market. Any of them could help you if you keep them clean. As they get dirty and wet from transpiration and saliva, it is going to be harder to breathe through them. Replace them every so often.

Some people might consider using a reusable mouth mask and while this is a good idea that will save money in future projects, do not wear one while it's wet and you are working. The power of your inhalation will attract more debris

Sunday, November 1, 2020

Insulating the Attic Floor or the Pitched Roof: Which Is the Better Approach?

Just how much impact does a well-insulated attic have on the effectiveness of a home’s overall insulation system? What most homeowners need to realize is that the attic, being the topmost part of the house and being connected to the roof, is an area that can quickly gain or lose heat through conductive heat transfer. It is a space that is susceptible to outdoor temperature extremes, which, in turn, affect the temperature levels within the  house.

Given the importance of insulating your attic, how do you then go about it? Do you need to install insulation both under the floor of the attic and under the slope of the roof? Or should you prioritize one over the other? In this short guide, we’ll attempt to answer this common query from homeowners with a few quick tips. The answers determine a lot of important decisions you’ll be making for your attic, such as what type of insulation to buy and how much of it to spend on.

Insulating a Finished vs. an Unfinished Attic

The rule of thumb is that if the attic is an unfinished space, insulating its floor is often sufficient enough to insulate this part of the house from the living spaces beneath. This is because you are already effectively insulating the ceiling of these living spaces.

On the other hand, if your attic is a finished space—meaning you use it either as a storage space or as living quarters—it would be best to insulate both the slope of the roof and the attic floor. Insulating the pitched roof does the job of preventing outdoor heat or chill from infiltrating the building envelope, while insulating the attic floor prevents heat transfer from occurring between the attic and the spaces underneath it.

Insulating Cathedral Ceilings

If your home has cathedral-type ceilings, then insulating the roof should be your top priority. This is because the ceiling directly underneath it is essentially part of the building envelope. Having such a cavernous ceiling design can expose the upper part of your house to a lot of conductive heat transfer if the ceiling is not properly insulated. This means your house could get hot or cold fast, and your heating or cooling system might not be able to cope well in terms of maintaining the indoor temperatures you desire. Roof insulation prevents heat from easily leaving your home during the cold months, while also preventing the ingress of warmth when you’re trying to cool your home during the hot summer months.

Choose the Best Type of Insulation for Your Attic Floor and Pitched Roof

The good news is that insulating your attic floor or your pitched roof is a relatively easy task. You can greatly improve the level of comfort inside your home simply by replacing or improving the insulation in these parts of your house. One of the most convenient and cost-effective ways to do this is by using insulation batts or rolls, which you can immediately purchase from hardware stores.  If you’re finding it challenging to install these blanket-type insulation products because you need to place them around irregularly shaped architectural assemblies, blow in insulation is an alternative you can consider. This is definitely a good option if you’re insulating an unfinished attic.

There are other options besides that you can explore as well. Spray foam insulation, for example, is also a good choice for insulating unfinished attic floors because it ensures that every crack, gap, or air hole is completely sealed off, preventing air and moisture from penetrating the attic. There are also roofing panels that come with built-in insulation cores. These are perfect for new construction projects, but you can also use them in existing structures, depending on the extent of refurbishment that you are willing to accomplish for your home.

In the end, what’s important is that you take into consideration what your attic’s role will be in your home. Insulating it properly will depend on its existing condition and its intended purpose. Hopefully, these tips have given you a clear idea of how to insulate your attic floor and your pitched roof, thus ensuring you a successful home improvement project!

8 Best Practices for Installing Insulation Batts in Your Attic

A big part of keeping your home comfortable and cozy throughout the year is making sure that your attic is well-insulated. This part of the house is often overlooked or neglected in terms of proper insulation because it is usually used as storage or simply left unfinished. However, even if your attic is not being utilized as a living space, it should still be given proper attention in terms of insulation because it is the biggest part of the house exposed to the elements by virtue of being closely connected to the roof.

When your attic is not correctly fitted out in terms of insulation, you’ll feel the impact on your electricity bills. This is because you may be exhausting your cooling or heating appliances just to maintain the right temperatures in your living spaces. A poorly insulated attic may also lead to more costly home maintenance and repair costs. The air and moisture that seeps into an under-insulated attic may allow nasty mold and mildew to grow indoors. This further puts the health of your family at risk. Water seepage may also damage the walls and ceilings of your home, thus compromising the structural integrity of your property.

One great solution for improving the insulation capacity in your attic is to install new batts or pre-cut pieces of blanket insulation. They’re easily available at home improvement stores like Pacific Insulation Supply. However, once you buy the batts, you’ll also want to ensure that they’re installed properly. To that end, here are our tips for successfully installing your new insulation batts into your attic.

Assess the Space

Proper installation of new batts depends on what the situation is like in your attic. Is it an unfinished space that you’ll have to insulate from scratch, or does it have existing insulation? The answers to these questions will determine what type of batt insulation you should buy. They’ll also determine how much batt insulation you need to achieve the ideal R-value for your whole attic.

Next, see which parts of the attic need extra insulation. For an unfinished attic, you may want to focus on the flooring because this is the part of the attic that’s connected to the living spaces below. For a finished attic, you can enhance the insulation by applying batts to the walls and ceiling.

Choose the Right R-Value for Your Insulation Solution

 Next, you’ll want to shop for insulation batts that have a high enough R-value. This is the rating that indicates how strong the batt’s insulation capacity is. As such, the higher the R-value of the material, the better its capability to insulate against conductive heat transfer. The US Department of Energy recommends R-38 insulation on most attic floors. In order to attain this R-value, you can buy R-38 solutions or you can purchase efficient R-30 insulation batts and layer them as necessary.

Determine Which Type of Batt Insulation You’ll Use for Your Attic

 Next, you’ll also want to choose particular batt insulation products for your attic. No two products are exactly the same, and one may be better for use in your attic than another. You can choose between unfaced and kraft-faced batts, the latter of which have vapor retarders on their kraft paper side. Note, too, that there are different batt insulation products made out of different natural materials, like mineral wool, fiberglass, or cellulose. When in doubt, research each material or ask your supplier which one is best for your application.

Seal Air Leaks

Now that you’ve bought your new batts, it’s time to prepare your attic for their installation. Before you lay the batts out, make sure there are no opportunities for air to leak in or out of your attic. The insulation will be ineffective if there are holes, spaces, or gaps  on the building envelope or on the attic floor. Thus, before you lay out any new insulation, make sure you completely seal off any air leaks that you may find in the joints and crevices of your attic.

Do One Last Check of Your Ventilation and Electrical Systems in the Attic

It’s also good practice to check the attic’s ventilation system and ensure that it’s properly functioning. You’ll be able to make the most of your attic insulation project if you can breathe properly there, and a big contributor is your ventilation system. Finally, be aware of any exposed electrical wirings, outlets, and sockets in your attic that may pose as fire hazards. Repair these immediately and secure them in place before installing the insulation batts.

Install a Baffle around Objects That Produce Heat

 One important principle of insulating an attic is to take special care around objects that produce heat, such as light bulbs. You will actually want to put space between these objects and the insulation material by creating a baffle around the former. For your attic, you can create a simple one out of either rigid foam or clean cardboard. Once your bulb or lamp has a baffle around it, you’ll be able to install the batts at least 3 feet away from each side.

 Cut Your Batts into Properly Sized Pieces

 Though the insulation batts are pre-cut, you will still need to measure and cut them out to guarantee an exact fit the architectural assemblies in your attic. To make this easier for you, measure the spaces where you’ll be laying out your new batts. Then, measure the batts and cut them down to the perfect size using a beam and a utility knife. They may need to be just a little wider than the space they will be put in to ensure a secure fit, but they shouldn’t be too big as to make them bunch up or crease. When you take this step, your new batts will be a breeze to press into place.

Pack Kraft-Faced Batts with the Kraft Side Down

Lastly, before you press the batts in, make sure they’re going the right side down. As a rule of thumb, if you’re using kraft-faced batts, you should pack them with the kraft side facing downwards. This is so that you get maximum efficiency from the paper kraft layer, which acts as the moisture retardant of the batt. The unfaced side should be on top, or the side that’s facing you.

Conclusion

 It’s truly worth your while to ensure that your attic is properly insulated. And contrary to what you may believe, this kind of home improvement job doesn’t have to cost you big bucks. As insulation solutions, batts are easy to install, highly affordable, and great at insulating attic spaces. You’ll even find a solid range of trustworthy batt insulation products here at Pacific Insulation Supply alone.

If you have any concerns regarding proper installation of new batts in your home, don’t hesitate to consult our experts. me.

5 Proven Advantages of Insulating a Home’s Attic

Let’s face it—as homeowners, we usually do not give much thought to our attics on a daily basis. This is especially true it is simply used as a storage space, in which case it pretty much gathers dust as it remains neglected for most, if not the entire duration, of the year. But did you know that the attic is perhaps one of the most important spaces in the home that affects your overall living experience?

Keep in mind that the attic is the part of the house that is connected to the roof, which is the biggest section of your home that is exposed to  the elements Thus, a large part of how comfortable your home will be is actually dependent on the condition of your attic. In particular, an attic should be well-insulated in order to create more pleasant living conditions inside the house.

Recommended R-values for attic insulation can be anywhere from R-30 to R-60, depending on the climate zone in which your home is located. If your home is situated either in zones 4 or 5, for example, the US Department of Energy recommends that you use R-38 insulation in your attic.

If you’re still not sure about what benefits you can gain from insulating your attic, we can help you. Below, we’ve listed the top reasons why you should install insulation in this part of your home.

It Can Help You Realize Enormous Electricity Cost Savings

Heating and cooling comprise anywhere from 50 to 70 percent of the  energy that an average household consumes. Experts say you can slash up to almost a third of your  electricity bill just by simply ensuring that your home has proper insulation, beginning with your attic and other often-neglected areas such as crawl spaces.

You Can Extend the Life of Your Heating and Cooling Appliances

 Naturally, when your home’s overall insulation system is not working properly, your heating and cooling appliances work overtime in order to achieve your desired temperature levels and provide you with a comfortable indoor living environment. You can therefore realize long-term cost savings from insulating your attic properly by way of not having to replace worn-out or broken heaters and air conditioning units in your home.

You Can Create More Comfortable Living Spaces

You may be surprised at how insulating your attic properly will do wonders in terms of making your home more comfortable and cozy all-year round. No matter how sophisticated your heating or cooling system may be, a poorly insulated attic will affect the rest of the house and make it more prone to the temperature changes outside. After all, warm air naturally rises, so in winter, the heat inside your home can quickly leave your home through the attic if it is not properly insulated. During the hot summer months, heat from the outdoors can also quickly infiltrate your home through an uninsulated attic by way of conductive and radiant heat transfer.

You Can Enjoy a More Sturdy House Free from Excess Moisture

Insulating your attic properly is an investment in fortifying the structural integrity of the upper part of your house.  Together with air sealing, attic insulation helps prevent the ingress of moisture into your home, which means that the inside of your house will not be exposed to humidity—often the cause of structural damage in homes.

You Can Look Forward to Better Indoor Air Quality

 By preventing the entry and buildup of moisture in your home, you’ll also be preventing the growth of mold, mildew, and other harmful organisms, which can circulate throughout your home and diminish the indoor air quality.  No mold and mildew means you and the other occupants will be less likely to suffer from respiratory problems and allergies.

If you haven’t had the time to check out your attic, now is the best time to do so and to take the first step towards properly insulating this very important part of your house.

Friday, October 30, 2020

Why is it Important to Have Proper Weather Insulation

As time passes on and your home is faced with the weather changes that correspond to each season, you might see that there is also a change in your energy bill. This change might not always be pleasant.

Therefore, it is important to have the proper insulation in your home or business so that the weather changes do not affect your lifestyle or your properties. For instance, if in your place of residence there is no snow, there is little benefit to be achieved if your insulation is planned for heavy snowstorms.

However, if your place of residence is an area with an abundance of rain or snow, it will be very important to have proper insulation just like when you live in a very hot area, it is important to properly insulate your home to prevent the cool indoor weather from escaping.

attic insulation

What are the advantages?

For starters, let’s consider energy costs. If you “just'' insulate your home without consideration as to the R-value you need or the insulating material that you should use as well as dismiss the process of insulation installation that you should follow, you can still see a reduction in your energy bill. Yet, if you follow proper procedure and you take the time to review and research what it is that you need, you will be able to see your energy bill go down up to 50% or even more!

This means, in layman’s terms, that the money and time you invest in doing proper insulation installation will reward you by paying itself! In an era of environmentally friendly homes, where we all seek to reduce our carbon footprint, it is important to start the process step by step. And the first step is to properly insulate your home.

Insulation will make indoor weather appliances more efficient and will expand their functional lifetime. The AC in the summer and the heater during the cold months of autumn and winter can work better if they do not have to compete with the outside weather sifting in through un-insulated walls or ceilings.

Not only that, but proper insulation will also reduce noise contamination, making your house a quiet and peaceful home where friends and family can enjoy life and love.

If you are part of the thousands of people who are turning to solar energy panels, insulation will also help you in this matter. The energy and heat that is saved from solar cells can be used more efficiently if you insulate your home. Furthermore, there is no need for you to compromise the benefits of green insulation for the use of something that is not environmentally friendly.

While it is a nice idea to be able to experience nice and comfortable indoor weather while the outdoor weather is less than comfortable, this can only be achieved through proper weather insulation.

The amount of money that you will be able to save once your home is properly insulated depends on different factors:

  • The amount of money you need every month to run indoor climate control appliances
  • An alternative use for energy supply in your home.

The amount of money you need every month to run indoor climate control appliances refers to the cost of electric bills or gas consumption that you use to properly run them. For instance, if you are prone to having an indoor climate that mimics the weather in the tropics in the middle of winter just like Homer Simpson, then you will need to spend a lot of money.

If your house isn’t insulated, achieving this indoor temperature will cost you an exorbitant amount of money which will be reduced as you insulate your home. The possibility of reduction also allows you to aim for a higher indoor temperature. If you do, then the amount saved will be lower.

This is a common mistake amongst homeowners and house residents. They believe that since there is going to be a money expenditure reduction, they can spend more and then find themselves disappointed when the end result is a smaller saving than what they expected.

When folks have to deal with cold weather and then they insulate their homes, the resulting warmth invites them to do other stuff such as cooking and baking. This can consume additional gas, thus reducing the amount saved by insulation.

Still, even with these considerations, there will be a reduction of money needed to pay for energy bills. All of these are good results and consequently, good news.

In order to achieve this, you will need to proceed with insulation, which in turn means to install it. This also means that you will have to make an investment or pay money to have them installed. In this area, you need to consider the following:

  • Type of insulation you use.
  • Size of your home
  • Age of your home (how long has it been since it was built)
  • Modifications, repairs that have to be done prior to insulation
  • Removal of exhausted, old insulation
  • Disposal of insulation related debris
  • Preparation for insulation installation
  • Expansion of the installation

The first thing that has to be cleared is the determination of your home (considering that it is not a newly built construction) has it been insulated before. If the previous insulation is still in place, what is its status, if it is still in working condition or if it needs to be replaced. It might also be that it HAS to be replaced because of construction or EPA standards, as it happens with asbestos insulation.

If it was insulated and the insulation needs to be removed, you will also need to dispose of it. Most insulations are prohibited to be thrown away in the general trash, and they must be taken to properly disposing of facilities.

If your home is fairly new or it hasn’t been insulated before, then you can progress into the preparation part which includes determining what type of insulation you should use. This is usually set by the area in which you are going to install the insulation. While most insulation materials can work anywhere, there are contradictory guidelines as some experts consider that each area of the house has a particular insulation material and R-value to be used.

The insulation materials can come in different presentations. These presentations might be handy for some areas and a hindrance to others. The determination will be done as soon as you decide which part of your home you will be insulating. The same applies to the preparation part.

It is a good idea to consider what is it that you need and then check the potential problems that are preventing you from achieving this. For instance, if your goal is to save money during the cold months of autumn and winter, then you need to check the walls and the ceiling of your home for previous or non-existent insulation.

If needed, you should insulate both the ceiling and the exterior walls of your home. It is true that hot air travels from hot areas to cold ones. And it is true that hot air tends to rise and cold air lingers at the bottom. In a home with no insulation, hot air will travel to the outside where it is colder. And it will rise to the ceiling and escape through the uninsulated area leaving the inside of the house cold.

Should I insulate ALL my house?

While it depends on what it is that you want to achieve, it might be a good idea to plan and consider insulating your entire house.

However, it is an expensive and time-consuming endeavor. Even if you are hiring professionals to help you achieve this goal, it will be uncomfortable and a hassle, so it might work in your best interest to work your home in segments.

While exterior walls can be divided into rooms, the ceiling is a different matter. This is the part of the house that can’t and should not be divided. Insulation installation and removal should be done with consideration of the ceiling or attic as one single room.

Experienced and conservative insulation professionals advise that, in terms of insulation materials, there are different materials and qualities and in the overall scheme, they all work fine. However, as a rule of thumb, good insulators will have a wool-like structure meaning that they will trap small pockets of air.

They comment that any person who seeks to have a properly insulated home should not rely solely on the insulation itself but also on decorative elements such as heavy curtains from fabrics such as cotton, hemp, and even plastic with fabric. Indeed, is common sense to wear heavy clothing during the cold weather and the opposite; light clothing during the hot weather.

Still, it is worth mentioning that while you insulate your entire home, it will always be a good idea and good measure to have proper garments.

Think of your home as a box containing several smaller boxes that constitute the different rooms in your house. Now, insulation will cover the outside of the big box so that the external weather does not affect the inside boxes or the people inside them.

installing vapor barrier

Plastic Vapor Barrier Basement Walls Plastic Vapor Barrier Basement Walls insulating basement walls vapor barrier basement decoration

It is important to cover all the box on the outside. If you fail to do that, something that is called “Thermal Bridges” can happen. This is when you walk from one warm room to another warm room and there is a cold spot, usually in the corridor or in a middle room whose temperature is significantly lower than those warm rooms.

This usually happens when there are parts of the big box that haven’t been insulated adequately. Thermal bridges are not only a problem because of the difference in temperature or the flow that they will imprint to the hot air; but because they are at a significantly lower temperature, they will clash with the hot air and create moisture.

Moisture becomes mold and mildew. Most homes have wallpaper, and modern-day trends have also decorated walls with fabrics that have an underlying addition of styrofoam.

Styrofoam as it is used in cushions and tapestries is prone to host mold and mildew. These are problems when you have elderly people, children, and humans with health conditions such as asthma.

This is another very important aspect of keeping your home properly insulated during weather changes.


Monday, October 26, 2020

7 Well-Known Benefits of Insulating a Home’s Crawl Space

Even though it’s not always visible to us, insulation plays a significant role in improving the comfort and energy efficiency within residential environments.

On top of insulating areas above ground like the external walls, the attic, and the roof, you also have to consider the areas beneath your home. Insulating the crawl space, for example, is an important aspect of achieving proper insulation for the entire house.

Below, we share the top seven reasons why you should insulate your crawl space.

1. Energy Efficiency

Out of the many benefits of insulating a crawl space, reduced energy consumption stands out as the most popular reason why homeowners install insulation under their homes. Without insulation, the heat or chill from the outside can easily penetrate into your home’s living spaces, requiring your HVAC system to work more to keep the indoor temperature at your desired level.

Next to the attic, the crawl space is the most important part of your house to insulate since it tends to be infiltrated by drafts that can cause a significant loss of heated or cooled air inside your home. So, if you’re searching for an opportunity to save energy in your home, prioritize insulating your crawl space.

2. Better Air Quality

Many outdoor pollutants, such as dust, pollen, and vehicle fumes, enter your home through unsealed gaps and cracks on the building envelope.Air sealing, when done together with insulation, not only keeps your living spaces comfortable, but it also prevents your indoor air from being contaminated by impurities from the outdoors.

A well-insulated home offers better indoor air quality and prevents the ingress of particles and pollutants that can pose a health hazard to its occupants. Your crawl space can be especially prone to mold growth. With insulation, you reduce the formation of moisture and condensation under your home, thus also reducing the chances for mold to grow while keeping your indoor air nice and clean.

3. Sound Control

Insulating your crawl space with fibrous materials such as cellulose, fiberglass, and mineral wool can reduce both airborne and impact noises from entering or traveling around your home. Whether you don’t want to hear your loud neighbors or you want to block out any construction or traffic noises nearby, installing insulation is a guaranteed way to reduce permeating sound waves that can disrupt the peace and quiet within your household.

4. Pest Prevention

Attics, basements, and crawl spaces are common areas for pests to invade. If you’re not paying attention to the state of your crawl space, who knows what could be crawling in there and threatening the health of your family by carrying various diseases and leaving their excrement behind?

Many rodents and insects prefer narrow and humid spaces, especially one with lots of cracks for them to crawl into. This makes your crawl space a prime candidate for infestation. Insulation that’s properly and neatly installed, however, can help keep your home pest-free while reducing drafts and cold spots.

5. Improved Comfort

Temperature regulation serves the dual purpose of reducing your energy consumption and keeping your rooms cozy throughout the summer and winter months. The living spaces above your insulated crawl space can be the perfect place for your family to spend time together or for the guests to be entertained.

6. Longer-Lasting HVAC Systems

If you want to keep your HVAC system functioning for as long as possible, you definitely need to consider crawl space insulation. When an HVAC system needs to work harder to heat, cool, or ventilate a home with inadequate insulation, it can encounter problems much sooner than systems in well-insulated homes.

Heat transfer may not seem like much of a threat, but it’s definitely making your HVAC system put in more work to keep your house as cold or as warm as you want it. Have in mind that these systems are costly to install and replace, especially if it includes ductwork. Fortunately, there are a few simple ways for you to ensure that it’s kept in good condition, such as periodic inspections, regular maintenance and repair, , and of course, proper insulation around your home.

7. Helps Reduce Fire Spread and Damage

Mineral wool and fiberglass insulation are both naturally fire-resistant materials that slow down the spread of flames. They can even play a crucial part in stopping a fire from developing in the first place.

Mineral wool is especially ideal for thermal applications due to its fire-resistant qualities. Because non-organic components are used, such as recycled iron and steel byproducts, the material is non-combustible and has a very high melting temperature.

Other types of insulation that aren’t completely fireproof, such as cellulose, can still be treated with flame retardants that can help it withstand high temperatures. When installed in crawl spaces, attics, and external walls, you can have better peace of mind knowing your home is less prone to fires.

Takeaway

If you’re looking to make your home more energy efficient, safer, and more comfortable, crawl space insulation offers all that and more. And the best part is that once it’s installed, you reap all the benefits without additional work, making it a solid investment for any homeowner.

Wednesday, October 21, 2020

Why do you need insulation?

As time passes on and your home is faced with the weather changes that correspond to each season, you might see that there is also a change in your energy bill.  This change might not always be pleasant.


Therefore, it is important to have the proper insulation in your home or business so that the weather changes do not affect your lifestyle or your properties.  For instance, if in your place of residence there is no snow, there is little benefit to be achieved if your insulation is planned for heavy snowstorms.  


However, if your place of residence is an area with an abundance of rain or snow, it will be very important to have proper insulation just like when you live in a very hot area, it is important to properly insulate your home to prevent the cool indoor weather from escaping. 


What are the advantages?


For starters, let’s consider energy costs.  If you “just'' insulate your home without consideration as to the R value you need or the insulating material that you should use as well as dismiss the process of insulation installation that you should follow, you can still see a reduction in your energy bill.  Yet, if you follow proper procedure and you take the time to review and research what it is that you need, you will be able to see your energy bill go down up to a 50% or even more! 


This means, in layman’s terms, that the money and time you invest in doing proper insulation installation will reward you by paying itself! In an era of environmentally friendly homes, where we all seek to reduce our carbon footprint, it is important to start the process step by step.  And the first step is to properly insulate your home.


Additionally, insulation will make the indoor weather appliances more efficient and will expand their functional lifetime. The AC in the summer and the heater during the cold months of autumn and winter can work better if they do not have to compete with the outside weather sifting in through un-insulated walls or ceilings.


Not only that but proper insulation will also reduce noise contamination making your house a quiet and peaceful home where friends and family can enjoy life and love.


If you are part of the thousands of people who are turning to solar energy panels, insulation will also help you in this matter.  The energy and heat that is saved from sun cells can be used more efficiently if you insulate your home.  Furthermore, there is no need for you to compromise the benefits of green insulation for the use of something that is not environmentally friendly.


While it is a nice idea to be able to experience a nice and comfiortable indoor wether while the outdoor weather is less than comfortable, this cna only be achieved through proper weather insulation.


The amount of money that you will be able to save once your home is properly insulated depends on different factors:


  • The amount of money you need every month to run indoor climate control appliances
  • Alternative use for energy supply in your home.


The amount of money you need every month to run indoor climate control appliances refers to the cost in electric bills or gas consumption that you use to properly run them.  For instance, if you are prone to having an indoor climate that mimics the weather in tropics in the middle of winter just like Homer Simpson, then you will need to spend a lot of money.


If your house isn’t insulated, achieving this indoor temperature will cost you a high amount of money which will be reduced as you insulate your home.  Nonetheless, the possibility of reduction also allows you to aim for a higher indoor temperature.  If you do so, then the amount saved will be lower.


This is a common mistake amongst homeowners and house residents.  They believe that since there is going to be a money expenditure reduction, they can spend more and then find themselves disappointed when the end result is a smaller saving than what they expected.


When folks have to deal with a cold weather and then they insulate their homes, the resulting warmth invites them to do other stuff such as cooking and baking.  This can consume additional gas, thus reducing the amount saved by insulation.


Still, even with these considerations, there will be a reduction of money needed to pay for energy bills.  All of these are good results and consequently, good news.  


In order to achieve this, you will need to proceed with insulation, which in turn means to install it.  This also means that you will have to make an investment or pay money to have them installed.  In this area, you need to consider the following:


  • Type of insulation you use.
  • Size of your home
  • Age of your home (how long has it been since it was built)
  • Modifications, repairs that have to be done prior to insulation
  • Removal of exhausted, old insulation
  • Disposal of insulation related debris
  • Preparation for insulation installation
  • Expansion of the installation


The first thing that has to be cleared is the determination if your home (considering that it is not a newly built construction) has been insulated before.  If the previous insulation is still in place, what is its status, if it is still in working condition or if it needs to be replaced.  It might also be that it HAS to be replaced because of construction or EPA standards, as it happens with asbestos insulation.


If it was insulated and the insulation needs to be removed, you will also need to dispose of it.  Most insulations are prohibited to be thrown away in general trash, and they must be taken to proper disposing facilities. 


If your home is fairly new or it hasn’t been insulated before, then you can progress into the preparation part which includes determining what type of insulation you should use.  This is usually set by the area in which you are going to install the insulation.  While most insulation materials can work anywhere, there are contradictory guidelines as some experts consider that each area of the house has a particular insulation material and R value to be used.


The insulation materials can come in different presentations.  These presentations might be handy for some areas and a hindrance for others.  The determination will be done as soon as you decide which part of your home you will be insulating.  The same applies with the preparation part. 


It is a good idea to consider what is it that you need and then check the potential problems that are preventing you from achieving this.  For instance, if your goal is to save money during the cold months of autumn and winter, then you need to check the walls and the ceiling of your home for previous or non-existent insulation.


If needed, you should insulate both the ceiling and the exterior walls of your home.  It is true that hot air travels from hot areas to cold ones.  And it is true that hot air tends to rise and cold air lingers at bottom.  In a home with no insulation, hot air will travel to the outside where it is colder.  And it will rise to the ceiling and escape through the uninsulated area leaving the inside of the house cold.


Should I insulate ALL my house?


While it depends on what it is that you want to achieve, it might be a good idea to plan and consider insulating your entire house.  


However, it is an expensive and time consuming endeavor.  Even if you are hiring professionals to help you achieve this goal, it will be uncomfortable and a hassle, so it might work in your best interest to work your home in segments.


While exterior walls can be divided into rooms, the ceiling is a different matter.  This is the part of the house that can’t and should not be divided.  Insulation installation and removal should be done with consideration of the ceiling or attic as one single room.


Experienced and conservative insulation professionals advice that, in terms of insulation materials, there are different materials and qualities and in the overall scheme, they all work fine.  However, as a rule of thumb, good insulators will have a wool-like structure meaning that they will trap small pockets of air.


Additionally, they comment that any person who seeks to have a properly insulated home should not rely solely on the insulation itself but also in decorative elements such as heavy curtains from fabrics such as cotton, hemp and even plastic with fabric.  Indeed is common sense to wear heavy clothing during the cold weather and the opposite; light clothing during the hot weather.


Still it is with mentioning that while you insulate your entire home, it will always be a good idea and good measure to have proper garments. 


Think of your home as a box containing several smaller boxes that constitute the different rooms in your house.  Now, insulation will cover the outside of the big box so that the external weather does not affect the inside boxes nor the people inside them.


It is important to cover all the box on the outside.  If you fail to do that, something that is called “Thermal Bridges” can happen.  This is when you walk from one warm room to another warm room and there is a cold spot, usually in the corridor or in a middle room whose temperature is significantly lower than those warm rooms.


This usually happens when there are parts of the big box that haven’t been insulated adequately.  Thermal bridges are not only a problem because of the difference in temperature or the flow that they will imprint to the hot air; but because they are at a significantly lower temperature, they will clash with the hot air and create moisture.


Moisture becomes mold and mildew. Most homes have wall paper and modern day trends have also decorated walls with fabrics that have an underlying addition of styrofoam. 


Styrofoam as it is used in cushions and tapestries is prone to host mold and mildew.  These are problems when you have elderly people, children and humans with health conditions such as asthma.


This is another very important aspect of keeping your home properly insulated during weather changes.

Thursday, August 27, 2020

PACIFIC INSULATION SUPPLY REACHES INDIANAPOLIS

Todd Bryson 

(424) 343-6530              FOR IMMEDIATE RELEASE

tbryson@pacificinsulationsupply.com


PACIFIC INSULATION SUPPLY REACHES INDIANAPOLIS


Pacific Insulation Supply Provides Insulation Products and Supplies for Homeowner and Contractors


Indianapolis, In.  July 31st, 2020.  Today Pacific Insulation Supply announced they would start services for Indianapolis’ residents and contractors.  Starting August 1st, Indianapolis residents and contractors can turn for all their insulation supplies need with prime quality products at very competitive prices. 


Since its origins in the middle of the continental United States, Pacific Insulation Supply has made a sound point of offering quality products and going that extra step by offering a delivery service; all this at very competitive prices.  They deal with only the best and most popular brands and products of the type.  Pacific Insulation Supply’s agents are well versed and so they provide valuable help and guidance to their clients, regardless if they are experienced or not. 


In the words of their CEO. “We aim to provide only the best in insulation products and supplies for the homeowner and the contractor.  There is no building that does not deserve the very best”. The company informs that they plan to continue the expansion of their service areas until they comfortably reach all the United States territory, both continental as well as overseas.  


With the coming cold season, now is the perfect time for homeowners to check on the condition and performance of the insulation that your home has.  It is a perfect time to change, correct or replace insulation and lower the energy and heating up bills. 


Since 2013 Pacific Insulation Supply has proven to be the best, and most affordable source for insulation supply sin the US continental territory. Their goal is to provide all homeowners and contractors with the best in the latest technology in insulation supplies,  at affordable prices.  


For more information or to contact Pacific Insulation Supply, contact them at (424) 343-6530, or visit them at their website: http://pacificmaterialsupply.com/

Monday, August 17, 2020

How to install Vapor Barriers on your Wall Insulation

Wall insulation is the second most important insulation to have in your home.  The wall area is the second most common and important leak for indoor weather and ambiance conditioning any household has.  As a result, it is the second most important energy bill leak for any family economy. 

Sadly, wall insulation still seems to be somewhat volunteer.  Not as frequently carried out as ceiling or basement insulation and, even though both ceiling and basement insulation are of high importance in the proper maintenance and sustaining of an adequate home, wall insulation is and should be placed high in the ranking of important things to do.

Unlike ceilings, there are definite installations in the walls that need to be properly isolated before setting up the insulation.  Most walls have electrical wiring, and a few of those will also have water and sewage installations.  These should be considered as well.

Besides, if your home has central heating or AC, the walls are some of the most common locations to place tubes and vents.  You also need to take these and windows into consideration. 

Before you start installing a Vapor Barrier

Every room has at least four walls.  On average, at least one of these walls will see to the outside of the house or will have a wall that is exposed to weather conditions.  These are the walls that should be insulated first. 

While insulation is not a complicated process, it can turn into a messy one depending on what type of finish you have in your walls, if you need to demolish it or just take it apart.  If you need to replace or remove existing insulation and vapor barriers, and so on.

In addition, you need to take the time to do it slowly.  Rushing into the process of insulating a wall can only cause problems in the long run, not only in terms of faulty insulation and escaping indoor weather but also in terms of energy bill expenses and potential short circuits and floodings.  Since electricity and water do not mix well, an electric shock is also a possibility.

Needless is to state that in those cases, flooding and short circuits, the cost to fix the problem usually ranges in the several hundred. If you factor in the problems that can arise from this such as fire hazards, electrical shocks, and harm to your health, then the potential damage is extraordinary and so is the amount it could cost to fix them.

So before you start, consider all these tidbits.  Then make a decision as to which wall will you be working on first.  Once that decision has been made:

  • Remove all small decorations such as paintings, picture frames, and the like from the room.
  • Move all the sizeable furniture pieces, the ones that can’t be easily transferred to another room on the opposite side of the wall where work will be carried out. 
  • If there are carpets in the room and these are removable, remove them. or roll them up against the pile of furniture that will be located in the room. 

Determine if what you need to do is replace the insulation, add insulation to the existing one, or install insulation from scratch.  The process is the same, especially in homes where the layout of masonry has been done and even people are already living in it.

The process of installing a vapor barrier

The process is quite standard and, provided you do take the process slowly, it’s going to be easier than insulating your ceiling or the basement.

Installing the insulation is quite simple, you need to follow the same basic principles that you did for the ceiling: 

  1. Prepare all you will need ahead of time. What tools, disposal receptacles, etc.
  2. Trim pieces of the insulation material that will make it easy for you to handle and manage.
  3. Remember to have handy the tuck tape and the poly film that you will be using for the vapor barrier.
  4. Install the insulation in the hard-to-get-places first, then proceed to the ones that are easy to reach.
  5. You might want to consider using a bit of the tuck tape to lay across the insulation to ensure that it will not fall off the wall.  This usually is not necessary since because the insulation is supposed to fit snuggly inside the allocated space.  However, the width might be off specs of an and that could cause the insulation material to slip off it’s assigned place.
  6. Spread the poly sheet from one end to the other.  Do not try to set it up all in place at once but spread it and then start fixing it from one end and work towards the other end.   
  7. Using a hammer stapler, and caulk fix the poly sheet to the wooden frame of the wall.  Work slowly and make sure that the poly sheet’s edge is firmly adhered to the wooden frame.  
  8. Once that is done, it is time to use the tuck tape to cover the staples that have perforated the poly sheet.  It is important not to trim the tuck tape into small bits doing so will compromise its efficiency.  It is better to use the tuck tape in one single strip. Therefore, when you use the hammer stapler, try your best to set them all in a single line, do not zigzag.
  9. Once this is all done, then you can refinish the wall and return the room to the way it was.

For wholesale Pricing on insulation. Call or text (424) 343-6530 . We can deliver direct to your site. Call Us Now (424)343-6530 or Message Us Now for bulk pricing.

or visit Wholesale Insulation Supplier Homewoner Guide

Sunday, August 9, 2020

Insulating an unvented attic

Are you insulating an unvented attic?

Per Johns Manville.........

Proper Installation Proper installation occurs directly under a sloped roof deck over an unvented attic space where no soffit, eave, gable, or ridge vents are installed in the roof.1 Also, in an unvented attic, the eaves and roof deck are air-sealed, rather than the attic floor. Insulation is then installed up to the bottom of the roof deck. When securing the batts to the roof deck it is critical that the batts be held firmly up against the roof, with minimal compression of each batt and minimal gaps between batts.

For this application, the roof framing is typically truss construction, with 2x4 or 2x6 truss top chords. Unfaced fiberglass batts are required with 24” full width product to cover the framing member. Typical thicknesses and R-values for this application are: • R-30 – 10¼” • R-38 – 13” • R-49 – 13 1/2”

Benefits of JM Fiberglass Batt Installation for Unvented Attics

• No special training required • Familiar materials and installation practices • Fewer installation steps than other air permeable insulation options • QII installation easily achieved This time-tested method is currently used for underfloor and commercial roof insulation installations with the addition of a different spacing pattern for straps.


https://www.jm.com/content/dam/jm/global/en/building-insulation/Files/BI%20Toolbox/BID-359-High-Performance-Unvented-Attic-Install.pdf

Friday, August 7, 2020

Climate Pro Blow in Insulation Coverage Chart

Climate Pro Blow in Insulation Coverage Chart

Climate Pro Coverage Chart

B7600-ClimatePro-Cavity-Wall-Data-Sheet

Climate Pro Blow In Insulation

Adding Insulation to Existing Insulation in the Attic

Adding Insulation to Existing Insulation in the Attic

The first and most important way for an indoor heat is to escape through the walls and ceiling.  The attic is probably the most important escape route for the heat or cool air in your home.  Most attics are insulated, but the state of the insulation, whether it remains effective, is anyone’s guess. Mainly because of just not knowing or the house is old.

check attic insulation

As a result, many folks think there is no actual need to supervise or check the status of the attic insulation.  It will add new insulation to the existing one with no additional work, skill or change.

Insulation specialists that are Pro over-laying Insulation

For some insulation specialists there is no actual need to change or replace the existing insulation, it will suffice to add new insulation to the existing one in an attempt to increase the R value.

These insulation specialists consider that the already existing layout of insulation in your attic is perfect to guide you in setting up the new insulation so that there are no installation mistakes and you do not have to pay additional to either correct them or change them.

For them, you should seek for insulation that is complementary to the insulation that is already installed.  Their assumption is that, for insulation that has been in place for a long while, the R value will decrease but will not disappear.  So that any new insulation’s R value can easily be added to the existing considering that the existing’s R value will be at least 1/3 of the original R value.

Therefore, if the existing’s R value originally was of 3, then it will become 1 that can be added to a new R value of 9 so your total R value in terms of insulation will be of 10. 

Some homeowners and insulation specialists claim that this has worked adequately for them without incidents or damage to the structure of their homes.  Others claim that this is not only false but a serious hazard in terms of potential fires and structural damage, regardless of the lack of insulation and the constant financial leak that this comprehends.

This practice technically does save time and money as there is little room for mistakes as the already installed insulation, even if it is in a poor condition, it will serve as a guideline or installation map.  It is important to consider if this route is the best route for you, your needs and your home. 

The Cons of overlaying

The cons on this approach are both the natural and logical decay of the already installed insulation.  It should be noted that are times change and tech it could be that the materials and complements used in the insulation that was used in your home are not banned or forbidden for many reasons including being a hazard to your life and health.

There is a chance for the new insulation to become faulty and misbehave as the previous insulation continues to decay.  The fixture of the previous insulation can become unattached and cause both insulations to dislodge.  This could happen also with the fixture of the new insulation over the old one.

Therefore, in a worst-case scenario and without considering the evidently possible electrical and fire problems, you could end up having to pay for the entire process twice with an additional plus as the old insulation decays further or needs to be detached from the new one and removed.

If you so choose to follow this path, then the best way for you to do so is to approach your local or trusted insulation specialist and have him do a quick checkup so he can recommend the best course of action and the ideal insulation complement for the existing insulation in your home.

There are a few more tidbits to consider, but those will be enumerated at the end of the post as they are the same for both currents.

Adding insulation over existing insulation

Proceeding with adding more insulation to an already insulated attic

Now that we’ve run through in gigantic leaps the benefits and disadvantages of adding new insulation to an existing insulation in your home’s attic, let’s start with a little more in-depth information.

The first thing to do is to decide how much more insulation would satisfy your needs and requirements.  This is not done by any other than checking the insulation in the attic itself.  The insulation should be level to the floor joists in the attic.  If you can easily differentiate it or you notice depressed or concave areas in the insulation inside the attic; then you need to add more insulation. 

One common mistake is believing that despite there are no concave places and that the floor joists aren’t easily noticeable in the attic, that there still will be a benefit from adding more insulation as to create hermetical chambers in your home.  This is not possible and in most cases it’s an expense that will yield no benefits. 

The insulation in your attic is enough if you:

  • Can’t see the floor joists
  • Check the state of the insulation around the rafter vents and the eaves
  • The layout of the insulation should be leveled.

How much insulation is enough?

Insulation levels are graded for informational purposes as R values.  These numbers provide information as to the insulation materials ability to resist the heat flow. High numbers mean that the R value is high and therefore the materials ability is also high.

There are standards for attic insulation currently is for R-38 which means that the insulation is anywhere between 10-14 inches.  This will depend on the insulation type which is the material in which the insulation is manufactured.

Therefore, in additional to estimating the amount of insulation you will need in your attic, you should also consider the kind of insulation that you will be seeking to install. Mainly because there is no forced reason to have the exact same material, kind, shape, form or R value installed new on your attic when there is already insulation installed.  

This gives you a new freedom as there is no need to use the same fiberglass batts or blankets, for instance, you can select complementing insulation presentations.  For more information on this, just contact us. 

Some helpful Tips for overlaying existing insulation

Nonetheless, there are a couple of guidelines you should be aware of when planning and setting up the installation of additional insulation:  

  • If you are planning on using loose fill or foam insulation, then it is important to make sure that the already existing insulation does NOT have backing, that would no paper nor foil backing.  It MUST be unfaced. 
  • The new insulation must NOT be faced either.  

As a note, it might be a good idea to have a professional install these types of insulation as they are, by themselves a two-person job. 

Ok, so there is NO need to remove the old insulation, right?

It depends on a variety of factors.  If everything is perfect and there are no negative elements to consider, then there should be need to remove the existing insulation in order to add more. 

If you are planning to install additional insulation  over existing one to cut costs and maximize the benefit, then you could take this approach just making sure that, as we have said before, you make sure that there are no problems with either the attic, the services that are installed or run through it nor the insulation itself. 

To get a quote on wholesale insualtion contact www.pacificinsulationsupply Call or text (424) 343-6530 . We can deliver direct to your site. Call Us Now (424)343-6530 or Message Us Now for bulk pricing.

Tuesday, July 28, 2020

What is plastic faced insulation?

What is plastic faced insulation?

Every area inside a home has a unique use and purpose.  While you can decorate your home anyway you like it and you can place furniture as you please, the rooms in the house have been created with a unique purpose in mind.

As such, the builder has created a specific room for each specific use.  There is ONE room that is meant to be the kitchen, ONE that is meant to be X bedroom and so on.  Each room has its purpose and so their needs.

There are times when homes become businesses.  Or homes are acquired by families who have different preferences or needs.  According to their needs and preferences, it might be that the insulation that is required for each part of the building changes.

This is not only applicable to buildings that were primarily intended to become homes and then were transmigrated to businesses.  It also applies to homes themselves.  It is important to understand and know what kind of insulation goes to a specific room and why.

Where do you use plastic faced insulation?

Plastic faced insulation is preferably used in basements.  Most people believe that basements “are not really an area of the home” and as such, there is no need to be concerned with.  But not only they are, they also hold several main structures and roles that are basic to the life of the building itself.

Each day more and more people turn around and realize that their basements are much more than a “second attic” or “another place to dump everything we do not need at the moment but do not want to throw away”.  Basements are slowly turning into livable rooms and places where family residents:  teenagers and the males of the home enjoy a room of their own.  Also known as a “man cave”.

In the case of office buildings, basements are also places where many equipment items are placed as these are usually cold.  Finally, it is in basements where mechanical systems, AC and heating are installed because they should NOT be placed outside the home unless there is no practical space.

Basements are dark, cold and usually humid.  These three qualities make basements a perfect place for pests and termites to settle down and even flourish.  Mold and mildew are also common basement residents.  If a garden surrounds the basement, this will be a more probable case than if concrete surrounded the basement. 

However, concrete is also laid on top of soil.  So, despite the reduction of insects and overall pests, that can happen if a basement is surrounded by concrete versus surrounded by garden; there will always be a magnet for insects and other unwanted critters.

To prevent this is what you use insulation for.  Keeping the basement at a normal temperature and avoiding the coldness and humidity take its toll and encourage the rampage of unwanted critters and development of mold and mildew.

So do I need to insulate the WHOLE basement?

In most homes, it is recommended that there is insulation between the floors.  The floor of one room is the ceiling of another and as such, it is recommended that the floors/ceilings are insulated to provide an additional layer of soundproofing.

Nonetheless, it is not particularly recommended that you insulate the basement ceiling.  These responses to the need for the basement to acquire the same temperature than the rest of the house.  If you are insulating the perimeter of the basement, then the coldness and humidity of it will no longer be an issue and you will have a basement with the same temperature or coolness than the rest of your home.

Regarding the basement walls, they should be insulated with a non-water sensitive insulation that prevents air from sifting inside and contacting the basement cold surfaces.  Otherwise what will happen is that moisture will start to form and the consequential mold and mildew will happen.

These moisture-attracting areas are not limited to the yearly weather cycle.  They are present all year round, but in the equation regarding what you need to do to insulate your basement, you should also consider the moisture spots that become present at some special weather months in the year such as during the raining season and winter, regardless if where you live snows or not. 

If you choose to use plastic faced insulation for your basement, it is important that you remember to use a fire/ignition barrier.  All plastics burn and when they do, the product toxic fumes and gases that can be extremely hazardous for sustaining life.  To ensure that you are using the right fire/ignition barrier, you can contact your local fire department.

There are, of course, other alternatives that you can use to the plastic-faced insulation.  And in the case of the basement, some contractors do recommend also the use of two complementary insulation to ensure that the moisture, coldness and water barrier for the basement is properly installed.

However, any basement is not constituted solely by a ceiling and walls, it also has a floor.  And it is probably the floor of the basement that part where insulating is more complicated.

The best place to insulate basements floors is underneath them.  The best insulation is a rigid one.   For this end, plastic faced insulation has a unique and perfect fit.

This is probably one of the least recommended processes that a basement can have mainly because the energy saving rates that this action yields in the short run isn’t that big and people tend to get discouraged by this.  However, in the long run, such a process will ensure that the basement is properly insulated, there is no mold nor mildew growth, any mechanics installed will require less maintenance and will broke down a lot less frequently.

The basement will be able to become a living space with a lot less effort; there will be less potential critters settling in.  It is important to know that since concrete dries “upward” when you insulated the basement floor and lay the concrete on top of the plastic-faced insulation, you need to be sure that the concrete is thoroughly dry before applying any finishes. 

In addition, impermeable interior floor finishes should be avoided to allow the concrete to “stay dry”


To get a quote on PSK insulation call Pacific Insulation Supply

Saturday, July 18, 2020

Is Fiberglass Insulation Fireproof?

Is Fiberglass Insulation Fireproof?

There are many insulation options in the market.  Designed and developed to accommodate specific needs in each part of the home or building construction, these insulation materials, mostly, are created with fire-retardant chemicals.

“Fire retardant” is a common term used in the insulation business.  For many it means that the insulation products can withstand tremendous fire temperatures without breaking a flame.  This misconception has given many homeowners the comfort and security to even bypass safety measures.

What does “fire retardant” mean?

The term “fire retardant” means that it will ignite, there is no question about it.  However, the time lapse that passes from being exposed to fire and catching fire makes the whole difference.  Insulation material without a fire-retardant coating will catch fire 3x faster than those that have the fire-retardant coatings.

There are many chemicals that are customary to use in insulation products manufacturing as fire-retardant solutions for insulation materials.  One of these common chemicals is Ammonium sulfate, this chemical will increase the combustion temperature for the material in which it has been applied.

This means that, for instance (DISCLAIMER: THIS IS JUST AN EXAMPLE TO MAKE A POINT), if a material such as wool, it will ignite after 5 seconds of being exposed to fire, when wool has been submersed in ammonium sulfate, then it will withstand the exposure to fire for about 10 seconds, that is double the time.


In addition, it decreases the maximum weight-loss rates as the material as it burns. Increases the production of residue or char.  This means that the material in which the ammonium sulfate is applied to, will have a lower tendency to become “volatile” in terms of small fire specs that are often carried out of the major fire to parts that haven’t been burned yet.

Despite its benefits, there is a problem.  When the ammonium sulfate decomposes (through moisture) or becomes wet, it produces sulfuric acid; this byproduct is highly corrosive to metals and dangerous for humans and any residents of the home.

While it is a very handy and effective chemical fire-retardant solution, its characteristic to change to sulfuric acid makes most installers prefer cellulose chemically treated with boric acid and borax.

Still, there is a benefit and the insulation industry has come up with corrosion inhibitors being added to the chemicals used to moisten the cellulose faced insulation products.

If you want to use insulation materials that have been prepared with this fire-retardant, it is important to make sure that there is no source or potential source for water nearby the insulation material to prevent it from getting wet. If you are insulating your ceiling, you will also need to ensure that there are not water leaks nor vapor leakage from the rest of the home. 

Kraft paper backed insulation fire hazard

 Among the list of many problems that a homeowner or contractor has to deal with when replacing or installing insulation in a building is the risk of a fire hazard. This is something none of us want to experience in our homes.

Upon installation of the new insulation or replacement of the old one, make sure that services installations such as gas, electricity and water have been properly isolated and their installations are in pristine condition. If they are not, then you will need to change or correct them until they are. 

One thing that we need to care for is the insulation that is installed or to be installed in our homes.   Insulation can be a very positive thing, but this positivity can also turn to become something negative as it explodes and combusts in fire.

Danger in all places

The right insulation applied the right way will enhance your home’s indoor weather and will save you thousands in energy bills.  However, this same insulation can burn and release toxins and poisonous gases into the very air that, in a fire, you will struggle to breathe.

When a fire starts, the same insulation that prevents warm air to leave your home will prevent -to an extent- fire from rapidly spreading into other areas of the house, but it will make the temperature of the room higher and that, in extinguishing a fire, can become troublesome if the fire department isn’t called on time.

After a while of being exposed to a fire source, all insulation will start to cave in and catch fire.  In those cases where the insulation does not combust, it is certain it will melt and it can burn and cause other surfaces and materials to catch fire.

How does it catch fire?

Insulation materials can combust as part of a building burning or as the chief source of fire. If the fire starts elsewhere in the home and as the fire progresses, it combusts the insulation materials, then they burn as part of the burning building. If they ignite because of a short circuit in their vicinity, then they will burn as the chief source of fire. 

Short circuits are just an example, there is no way to single out a source for a fire.  It can be a match, a cigarette- or any other source.  It is important to know that the electrical installation of your home can also be the source of the fire. 

When the installation of the insulation is poorly done, it puts at risk the house since most likely, installations such as water, gas, electricity and even the weatherproofing of the roof and outside of the house are equally shady. In one such example, the electrical circuits are suffocated with the insulation material.  Such action will probably overheat the electrical cords and, in time, it can lead to a short-circuit and the consequential fire.

In addition, if the insulation material is covering other installations without the proper consideration, such as the heat-producing devices can affect their performance and consequently force you to spend more money to have them working properly.  This is without considering that any appliance will overwork and overheat.

Toxicity

Undoubtedly, all insulation materials burn.  They are not fireproofed as there are little materials that can withstand a long and heavy exposure to fire.  Mostly, any construction- or home-related materials will burn even if they do not so immediately.

However, since the moment the insulation products are exposed to fire, their chemical structure changes and there will be a release of toxic gases and smoke.  The amount of gasses and smoke released will vary and become more intense the longer the insulation materials are exposed to the fire.

In the same manner, if a person is exposed to these toxic releases, he or she will begin to feel sick and dizzy. If the exposure is prolonged, it can be life threatening.  While kraft insulation has paper backing, the paper has been treated and it will also release toxic smoke and gasses like any other form of insulation.

As the fire consumes the insulation material, the smoke will get thicker and it can cause problems for the inhabitants of the home when they try to get out of harm’s way.

It is always a superb idea to be additionally careful how you install insulation materials that have a paper backing of any kind.  Especially if these papers have oily substances added for functionality and/or efficiency.

Sometimes insulation materials that have paper backing have additional materials such as asbestos.  While these might be banned or prohibited in your area, they can be extremely dangerous for your health if they are exposed to fire.

Something else to know about.

Despite the evidently logical reaction of insulation to fire, there are those who firmly believe that insulation is fireproofed and the fact that it is stated as fire retardant means that it will neither succumb to the exposition to fire.

Consider typical insulations; these are made of wood, paper, cork and cotton as their primary materials.  These materials are known as “cellulose insulation” as they are related to this by their source, origin or the fact that they can be considered byproducts.

The proposal of being retardant lies because in most cases, cellulose derived and kraft paper faced insulation are often covered in one or more layers of fire-retardant chemicals.  These chemicals are referred to as “Thermal barrier”.  Their sole purpose is to actually ensure that the ignition of the materials as they are exposed to fire for a long period of time is delayed.

The concept in this is that by delaying the ignition of the materials as they are exposed to fire, it will give time for either the fire department or the homeowner to arrive to the ignited area with a fire extinguisher or any other fire-battling tool that will prevent the insulation from getting caught on fire and causing the evident damages.

While these thermal barriers are required by the Consumer Product Safety Commission, each fire situation is unique and it can’t be bundled with any other as part of a generic situation.  It is important to consider that while the insulation passes the CPSC requirements, it may react differently than expected when given the condition for a particular fire.