Pacific Building Materials brings wholesale pricing of Insulation to Homeowners and Contractors that live within delivery distance of our 26 locations.
Every area inside a home has a unique use and purpose. While you can decorate your home anyway you like it and you can place furniture as you please, the rooms in the house have been created with a unique purpose in mind.
As such, the builder has created a specific room for each specific use. There is ONE room that is meant to be the kitchen, ONE that is meant to be X bedroom and so on. Each room has its purpose and so their needs.
There are times when homes become businesses. Or homes are acquired by families who have different preferences or needs. According to their needs and preferences, it might be that the insulation that is required for each part of the building changes.
This is not only applicable to buildings that were primarily intended to become homes and then were transmigrated to businesses. It also applies to homes themselves. It is important to understand and know what kind of insulation goes to a specific room and why.
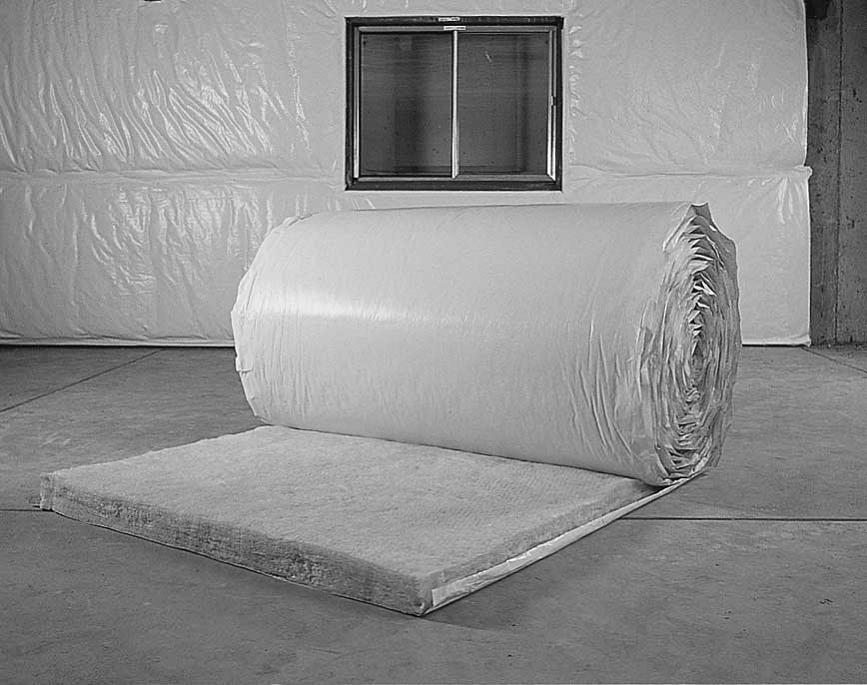
Where do you use plastic faced insulation?
Plastic faced insulation is preferably used in basements. Most people believe that basements “are not really an area of the home” and as such, there is no need to be concerned with. But not only they are, they also hold several main structures and roles that are basic to the life of the building itself.
Each day more and more people turn around and realize that their basements are much more than a “second attic” or “another place to dump everything we do not need at the moment but do not want to throw away”. Basements are slowly turning into livable rooms and places where family residents: teenagers and the males of the home enjoy a room of their own. Also known as a “man cave”.
In the case of office buildings, basements are also places where many equipment items are placed as these are usually cold. Finally, it is in basements where mechanical systems, AC and heating are installed because they should NOT be placed outside the home unless there is no practical space.
Basements are dark, cold and usually humid. These three qualities make basements a perfect place for pests and termites to settle down and even flourish. Mold and mildew are also common basement residents. If a garden surrounds the basement, this will be a more probable case than if concrete surrounded the basement.
However, concrete is also laid on top of soil. So, despite the reduction of insects and overall pests, that can happen if a basement is surrounded by concrete versus surrounded by garden; there will always be a magnet for insects and other unwanted critters.
To prevent this is what you use insulation for. Keeping the basement at a normal temperature and avoiding the coldness and humidity take its toll and encourage the rampage of unwanted critters and development of mold and mildew.
So do I need to insulate the WHOLE basement?
In most homes, it is recommended that there is insulation between the floors. The floor of one room is the ceiling of another and as such, it is recommended that the floors/ceilings are insulated to provide an additional layer of soundproofing.
Nonetheless, it is not particularly recommended that you insulate the basement ceiling. These responses to the need for the basement to acquire the same temperature than the rest of the house. If you are insulating the perimeter of the basement, then the coldness and humidity of it will no longer be an issue and you will have a basement with the same temperature or coolness than the rest of your home.
Regarding the basement walls, they should be insulated with a non-water sensitive insulation that prevents air from sifting inside and contacting the basement cold surfaces. Otherwise what will happen is that moisture will start to form and the consequential mold and mildew will happen.
These moisture-attracting areas are not limited to the yearly weather cycle. They are present all year round, but in the equation regarding what you need to do to insulate your basement, you should also consider the moisture spots that become present at some special weather months in the year such as during the raining season and winter, regardless if where you live snows or not.
If you choose to use plastic faced insulation for your basement, it is important that you remember to use a fire/ignition barrier. All plastics burn and when they do, the product toxic fumes and gases that can be extremely hazardous for sustaining life. To ensure that you are using the right fire/ignition barrier, you can contact your local fire department.
There are, of course, other alternatives that you can use to the plastic-faced insulation. And in the case of the basement, some contractors do recommend also the use of two complementary insulation to ensure that the moisture, coldness and water barrier for the basement is properly installed.
However, any basement is not constituted solely by a ceiling and walls, it also has a floor. And it is probably the floor of the basement that part where insulating is more complicated.
The best place to insulate basements floors is underneath them. The best insulation is a rigid one. For this end, plastic faced insulation has a unique and perfect fit.
This is probably one of the least recommended processes that a basement can have mainly because the energy saving rates that this action yields in the short run isn’t that big and people tend to get discouraged by this. However, in the long run, such a process will ensure that the basement is properly insulated, there is no mold nor mildew growth, any mechanics installed will require less maintenance and will broke down a lot less frequently.
The basement will be able to become a living space with a lot less effort; there will be less potential critters settling in. It is important to know that since concrete dries “upward” when you insulated the basement floor and lay the concrete on top of the plastic-faced insulation, you need to be sure that the concrete is thoroughly dry before applying any finishes.
In addition, impermeable interior floor finishes should be avoided to allow the concrete to “stay dry”
To get a quote on PSK insulation call Pacific Insulation Supply
There are many insulation options in the market. Designed and developed to accommodate specific needs in each part of the home or building construction, these insulation materials, mostly, are created with fire-retardant chemicals.
“Fire retardant” is a common term used in the insulation business. For many it means that the insulation products can withstand tremendous fire temperatures without breaking a flame. This misconception has given many homeowners the comfort and security to even bypass safety measures.
What does “fire retardant” mean?
The term “fire retardant” means that it will ignite, there is no question about it. However, the time lapse that passes from being exposed to fire and catching fire makes the whole difference. Insulation material without a fire-retardant coating will catch fire 3x faster than those that have the fire-retardant coatings.
There are many chemicals that are customary to use in insulation products manufacturing as fire-retardant solutions for insulation materials. One of these common chemicals is Ammonium sulfate, this chemical will increase the combustion temperature for the material in which it has been applied.
This means that, for instance (DISCLAIMER: THIS IS JUST AN EXAMPLE TO MAKE A POINT), if a material such as wool, it will ignite after 5 seconds of being exposed to fire, when wool has been submersed in ammonium sulfate, then it will withstand the exposure to fire for about 10 seconds, that is double the time.
In addition, it decreases the maximum weight-loss rates as the material as it burns. Increases the production of residue or char. This means that the material in which the ammonium sulfate is applied to, will have a lower tendency to become “volatile” in terms of small fire specs that are often carried out of the major fire to parts that haven’t been burned yet.
Despite its benefits, there is a problem. When the ammonium sulfate decomposes (through moisture) or becomes wet, it produces sulfuric acid; this byproduct is highly corrosive to metals and dangerous for humans and any residents of the home.
While it is a very handy and effective chemical fire-retardant solution, its characteristic to change to sulfuric acid makes most installers prefer cellulose chemically treated with boric acid and borax.
Still, there is a benefit and the insulation industry has come up with corrosion inhibitors being added to the chemicals used to moisten the cellulose faced insulation products.
If you want to use insulation materials that have been prepared with this fire-retardant, it is important to make sure that there is no source or potential source for water nearby the insulation material to prevent it from getting wet. If you are insulating your ceiling, you will also need to ensure that there are not water leaks nor vapor leakage from the rest of the home.
Kraft paper backed insulation fire hazard
Among the list of many problems that a homeowner or contractor has to deal with when replacing or installing insulation in a building is the risk of a fire hazard. This is something none of us want to experience in our homes.
Upon installation of the new insulation or replacement of the old one, make sure that services installations such as gas, electricity and water have been properly isolated and their installations are in pristine condition. If they are not, then you will need to change or correct them until they are.
One thing that we need to care for is the insulation that is installed or to be installed in our homes. Insulation can be a very positive thing, but this positivity can also turn to become something negative as it explodes and combusts in fire.
Danger in all places
The right insulation applied the right way will enhance your home’s indoor weather and will save you thousands in energy bills. However, this same insulation can burn and release toxins and poisonous gases into the very air that, in a fire, you will struggle to breathe.
When a fire starts, the same insulation that prevents warm air to leave your home will prevent -to an extent- fire from rapidly spreading into other areas of the house, but it will make the temperature of the room higher and that, in extinguishing a fire, can become troublesome if the fire department isn’t called on time.
After a while of being exposed to a fire source, all insulation will start to cave in and catch fire. In those cases where the insulation does not combust, it is certain it will melt and it can burn and cause other surfaces and materials to catch fire.
How does it catch fire?
Insulation materials can combust as part of a building burning or as the chief source of fire. If the fire starts elsewhere in the home and as the fire progresses, it combusts the insulation materials, then they burn as part of the burning building. If they ignite because of a short circuit in their vicinity, then they will burn as the chief source of fire.
Short circuits are just an example, there is no way to single out a source for a fire. It can be a match, a cigarette- or any other source. It is important to know that the electrical installation of your home can also be the source of the fire.
When the installation of the insulation is poorly done, it puts at risk the house since most likely, installations such as water, gas, electricity and even the weatherproofing of the roof and outside of the house are equally shady. In one such example, the electrical circuits are suffocated with the insulation material. Such action will probably overheat the electrical cords and, in time, it can lead to a short-circuit and the consequential fire.
In addition, if the insulation material is covering other installations without the proper consideration, such as the heat-producing devices can affect their performance and consequently force you to spend more money to have them working properly. This is without considering that any appliance will overwork and overheat.
Toxicity
Undoubtedly, all insulation materials burn. They are not fireproofed as there are little materials that can withstand a long and heavy exposure to fire. Mostly, any construction- or home-related materials will burn even if they do not so immediately.
However, since the moment the insulation products are exposed to fire, their chemical structure changes and there will be a release of toxic gases and smoke. The amount of gasses and smoke released will vary and become more intense the longer the insulation materials are exposed to the fire.
In the same manner, if a person is exposed to these toxic releases, he or she will begin to feel sick and dizzy. If the exposure is prolonged, it can be life threatening. While kraft insulation has paper backing, the paper has been treated and it will also release toxic smoke and gasses like any other form of insulation.
As the fire consumes the insulation material, the smoke will get thicker and it can cause problems for the inhabitants of the home when they try to get out of harm’s way.
It is always a superb idea to be additionally careful how you install insulation materials that have a paper backing of any kind. Especially if these papers have oily substances added for functionality and/or efficiency.
Sometimes insulation materials that have paper backing have additional materials such as asbestos. While these might be banned or prohibited in your area, they can be extremely dangerous for your health if they are exposed to fire.
Something else to know about.
Despite the evidently logical reaction of insulation to fire, there are those who firmly believe that insulation is fireproofed and the fact that it is stated as fire retardant means that it will neither succumb to the exposition to fire.
Consider typical insulations; these are made of wood, paper, cork and cotton as their primary materials. These materials are known as “cellulose insulation” as they are related to this by their source, origin or the fact that they can be considered byproducts.
The proposal of being retardant lies because in most cases, cellulose derived and kraft paper faced insulation are often covered in one or more layers of fire-retardant chemicals. These chemicals are referred to as “Thermal barrier”. Their sole purpose is to actually ensure that the ignition of the materials as they are exposed to fire for a long period of time is delayed.
The concept in this is that by delaying the ignition of the materials as they are exposed to fire, it will give time for either the fire department or the homeowner to arrive to the ignited area with a fire extinguisher or any other fire-battling tool that will prevent the insulation from getting caught on fire and causing the evident damages.
While these thermal barriers are required by the Consumer Product Safety Commission, each fire situation is unique and it can’t be bundled with any other as part of a generic situation. It is important to consider that while the insulation passes the CPSC requirements, it may react differently than expected when given the condition for a particular fire.
Every home needs to have proper insulation. Through insulation, any housing or office building can provide adequate weather for a comfortable residence and time spent.
All insulation is created and designed with the unique purpose of keeping a distinct differentiation between weather. The weather outside should stay outside while the weather inside should remain unchanged.
As a rule of thumb, there are only three conditions in which insulation should be installed or replaced:
1- It is a recent construction, and it needs to be insulated.
2- The construction is undergoing renovation and at this time, it is always a magnificent idea to check on the state, condition and performance of the already installed insulation.
3- The building is 20+ years old, and it is advisable that the insulation should be checked for condition and performance as its life-span is almost done.
These conditions are not the only thing that can cause an insulation replacement or installation. Despite that insulation installment is a law stated procedure, there are still homes that are standing strong who do not have an insulation installation or worse, who happen to still have asbestos-based insulation.
Attic insulation
In most cases, attics are the first parts of the building to either lack this important part or to have a non-adequate installation. If you are planning to buy or to renew your home, the attic is always a suitable place to start and checking the state of the installation is, naturally, a given.
If you are a Sunday do-it-yourself kind of person, it is always advisable that regarding checking the condition and performance of the already installed insulation to contact any attic insulation contractors. A simple query: Attic insulation contractors near me- can point you in the right direction.
Keep in mind if the attic insulation is in a poor condition, doesn’t work properly or its materials are outdated or even outlawed, then removal is a must. For this, the company that you seek when querying attic insulation contractors near me should also be one of any attic insulation removal companies available in every city in the USA.
An alternative is to simply hire an attic insulation removal and replacement company. This would come in handy if you are not experienced in how to do the removal or the installation of insulation materials. If your home is 20+ years or you plan to do a renewal or update of the entire building, then an attic insulation removal and replacement company is the best way to go to ensure that everything from the preparation -including the isolation of the electric, water and gas lines- to the actual insulation installation are done in the right way.
Any residential insulation contractors will do?
If you are not experienced in insulation installation or have done none ever. It is not recommendable for you to venture without the help of someone experienced. You could approach your choice of the many insulation companies for assistance and guidance.
Getting guidance and help from insulation companies near me is an adequate way to tackle the inspection and removal of an existing insulation installation in your home. It is important to emphasize that doing the entire home insulation inspection and removal is not an easy feat.
There are a handful of requirements when dealing with attic insulation that should never be dismissed or taken lightly:
Service installations: Electricity, water, heat, AC, etc. should be isolated independently and the insulation must avoid them
The area where the previous insulation was installed should be properly cleaned and debris, dust and residue should be removed.
The attic must be made sure that it has no water nor vapor leaks.
The right insulation should be installed.
There are many varieties of insulation providers in the market. From spray foam to fiberglass insulation. Each one has a unique way to properly installed. Doing so in any other way can hinder, damage or obstruct the proper function of the insulation.
Wrongfully installing insulation in your attic will not cause your home to come crashing down, but with some insulation products, if they are not properly installed the damage can cause corrosion in the support beam. In other cases, they will let the indoor weather out and cause you additional energy expenses.
Therefore, it is important that you are honest with yourself and acknowledge if you are both experienced and crafted enough to do a well-processed insulation replacement and installation or not.
Again, in the first case, definitely seek the guidance and help of a local insulation contractor or any of the many insulation companies in your area. Maybe the first home insulation company you approach or the first few ask you for some guidance fee, that would be up to you to choose whether to pay it.
Regardless, it is important to stress the benefits that a do-it-yourself will have from a professional company guiding and helping to sort out any problems or installation hiccups.
In the second case, interview a few companies. Ask them questions and get estimates. From these local insulation contractors, you will find the company that makes you feel the most comfortable with.
Wall Insulation
The attic is not the only place in a house or a commercial building that uses insulation. While attic insulation helps maintain the weather outside and inside separate and comfortable for the inhabitants and users of the buildings, insulation in other parts of the building have a function too.
For instance, wall insulation will provide soundproof walls in the rooms of the house. Just like with the attic insulation, if your home or interested building is 20+ old, maybe it has already been wall-insulated and just like with the attic, renewal is a great opportunity to check on the status of the insulation, whether it is functional still or if it is time to change it.
Just like with an attic, you can call for an insulation removal contractor that will take care of carefully taking away any old and/or decayed insulation materials in your walls. If you choose for this approach during the insulation removal is the perfect time to check on the status of the household installations such as phone, electricity, water, plumbing.
As we discussed it in the attic segment of this article, these installations should be isolated as the insulation materials often react badly to the influence of external sources such as water, water vapor and humidity.
Maybe the insulation removal contractor you seek to take care of this does not take care of the isolation of the already existing house installations. In such a case, you could do another query for insulation companies near me that will provide you with a full and well rounded up service.
Nonetheless, you can seek a specific residential insulation contractor that specializes in the insulation material that you have installed in your walls. One of the most popular choices is fiberglass insulation.
Since fiberglass insulation does not accumulate dust, mold or mildew is one of the most popular choices. You can find a fiberglass insulation installer by conducting a quick search in your favorite search engine. There are, indeed, many wall insulation companies that specialize in fiberglass insulation installation.
Finally, if you are planning on doing the wall insulation installation yourself, unless you are experienced in the insulation installation process, avoid working on wall insulation by yourself. The reason is simple: Every home has service installations set up inside the walls, mainly electricity.
When an electrical installation isn’t properly isolated and the insulation is placed without knowing how to do it in the proper way, the chances for an electrical fire increase.
Wall insulation companies provide the best service and they might provide you with the guidance you need to do the insulation installation yourself.
What happens if the building to insulate is NOT a home?
Commercial insulation contractors usually take care of the entire process regarding insulation installation in commercial buildings. Checking for the status and condition of an existing insulation installation and the removal and the installation of the fresh insulation materials.
In the specific case for commercial structures, maybe the best insulation is spray foam as this insulation material is easily applicable, hardens quickly and, if it is installed properly, has the least amount of hindering in everyday activities, so important for businesses.
Businesses often need to have their buildings properly insulated. The traffic of humans in and out every day can cause an imbalance in the steadiness in the indoor weather. For instance, when it is summer, most companies have their own AC installations working during business hours to provide a nice and comfortable environment for their employees and visitors.
This will create a happy employee that will work faster and harder for the company and a happy visitor that will translate into a bigger income. Some businesses have been settled in previously single-family homes; the business itself has a more relaxed, comfortable and inviting presence, but it also means that in terms of maintenance, it has to be done as if it still was a single-family home.
Here, it is important to start the insulation check up like you would in your own home: From the attic and then move into the walls and ceilings of the rest of the construction.
For efficiency and speed purposes, maybe the best way to do the insulation in your particular location is with spray foam installers. It is always advisable to find a reputable commercial insulation contractor that will provide you with the alternatives, information and budgets for you to make an adequate and informed decision.
Two things to remember:
1- If the insulation remover that is coming at your location to take care of this process does not convince you, dismiss him and hire someone else. Removing the insulation is just as a delicate part of the process as installing it. A shady removing process can cause you several hundreds in expenses for isolating and repairing damage installations.
2- Spray foam insulation companies are specialized companies that focus specifically on this particular insulation. Doing a spray foam insulation by yourself can be difficult and tricky. You could end up causing more damage than benefit, even if you are seeking guidance from either other spray form insulation contractors or general commercial insulation contractors.
Getting your home the right insulation can save you thousands of dollars a year in energy bills and ensure that the effort you are putting in providing a comfortable environment isn't gone to waste.
Sometimes, the problem is not exactly doing the effort of creating a nice indoor climate, but how to ensure that this climate is adequately kept. To this end, you insulate your home. Among the many insulation options available for the homeowner, there is one that stands above the rest: Paper faced insulation.
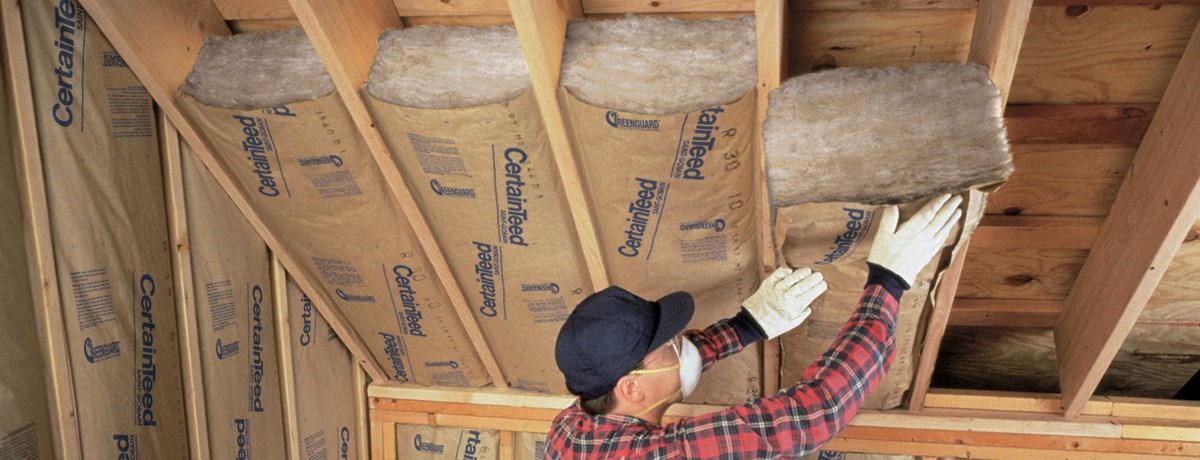
Paper faced insulation means that one side of the insulation material comes lined with paper. This is usually Kraft paper, but sometimes other types of paper can be used. The purpose and way to apply is basically the same. Any potential changes can be secured by asking your local insulation dealer.
The first thing that you need to know is what type of insulation will work best for your home. It could just as well be a paper faced material or an unfaced material (this kind of material lacks the paper that gives it steadiness). An unfaced insulation product does not mean that this product is any less effective that its paper-faced counterpart.
So it is just the same?
You can view or understand insulation the same way you understand gasoline for your car. There are three types of octanes sold in the USA: Regular, Mid-grade and Premium. While all three power up our cars, they are by far not the same thing and you can’t and should not use them instinctively in your car.
The same applies to faced, unfaced and other kinds of insulation products. For many contractors, the decision to use one kind of insulation over the other depends solely on preference rather than a by-the-book decision-making process. If you are planning on doing your home’s insulation installation yourself, it will depend on your experience installing insulation in your home.
Faced insulation products not only use paper, they can also use aluminum foil, vinyl and even aluminum paper. It is important not to mix them nor use the wrong faced insulation product for each task.
When to use paper faced?
Mostly, paper faced insulation is the best choice for neophytes in insulation installations. It is also recommended for homes that haven’t been insulated. The ideal places for this insulation are:
Walls
Ceilings
Floors
Crawl Spaces
If you are looking to insulate attics or between floors when both of them are inhabited; then you might want to use unfaced insulation. This will add soundproofing.
What is the purpose of the paper?
Using paper in the insulation material provides an already built-in vapor barrier that will prevent water to sift into the wall or the structure of the house. While you might think you do not need the paper faced insulation because there are no water lines in the area you will be insulating; you will need to comply with state and federal regulations, so paper faced insulation might be a must in your area of residence.
When you are handling the faced insulation material, you will need to handle it with care, the paper, like in any other situation can become detached or ripped and that could cause serious problems in the long run. If at any point you need to trim it or cut it down to size, make sure you do so with the paper side facing you so it is the first thing you cut.
Doing this will ensure that the paper is cut and not torn. As I have mentioned, there are alternatives to the paper faced insulation products, but most of these alternatives require experience and over two hands in the proper installing process. In definite, these are not adequate for inexperienced insulation installers.
Now, it is a common mistake to believe that since the faced insulation products have a side with paper; it is needed to have more of them just like in the case of loose-fill insulation and foam insulation. This is not the case. The entire insulation product has been created with the idea that there is no need to add layers of insulation on top of each other for a perfect insulation. Doing so can cause the opposite effect.
When you install paper faced insulation, it is important to remember to set it with the paper facing the wall. While there is no actual problem to install it the other way around, it will require drywall to cover the paper and prevent accidental fires.
Most insulation products are fire retardant. However, that does not mean that they are fireproofed. They will still combust and they will still burn down if they are exposed to fire for a lengthy period.
In some insulation presentations, the paper adheres to the insulation material with asphalt. This makes the paper impermeable to water vapor and creates a barrier that will keep the warmth of the home where you want it instead of migrating to the outward of the house and into the wall or other structures.
This is the reason you need not add a vapor barrier when you are using paper faced insulation.
Installing insulation has almost the same steps for all:
Measure the roll or batt of insulation to the area that you are going to install it in. If it is too big, then trim it to size. Remember to set the paper faced insulation upwards. To ease the cutting it might be helpful to pin it down with a piece of plywood.
Cut carefully
Once you have successfully cut it down to size, gently fit it into the cavity without using force. Otherwise you will damage it and reduce its efficiency.
Fold out the paper flange along one side of the insulation. Position the flange flat against the side face of the wall stud (or floor joist or roof rafter) so the edge of the flange is flush with the interior edge of the stud, joist, or rafter. Staple the flange to the side of the framing member with staples spaced about 12 inches apart (or as directed by the manufacturer). Repeat to fasten the other side flange.
Be careful when insulating through plumbing pipes and electrical wiring. For these parts, most experts consider that the best approach is to leave them free- from insulation materials. The best approach is to take many pictures and approach a contractor or your local insulation supplier for advice.
If you are uncertain as to which type of insulation works best for you, your local contractor or insulation retailer will be able to provide you with help.
There are many types of homes in the USA. some of them do not have attics in them, instead, they might have small crawl spaces or none. While we should insulate any home, the way to approach this task differs from one kind of home to another.
Ceiling insulation will assure you that your energy bill will not go overboard. During the raining season months and months of winter, the warmth that you set your home for will remain without additional problems and will not escape through the ceiling.
However, any house has “more ceilings” than the one we all know where Santa lands his sleigh every Christmas. Each room has a ceiling and a floor. Each room in the house has an original purpose and a different need in terms of insulation.
So it does not matter where to start?
Yes, it matters. The first ceiling you should insulate is the one that covers all others. That is the rooftop of your home. The reason for this is that the rooftop of your house is the weakest link in the entire building. Through this point of entry or exit the warmth of the sun sifts into the house stealing it off its coolness during the hot months of summer or allows the warmth to escape in the raining months or winter.
Once you have successfully insulated the roof of your home, then you can proceed with the insulation of the other rooms in your home. It will depend on what you need for each one. Consider that not every room has the same needs and requirements.
For instance, the nursery might want to have a sound proof insulation that prevents the baby from waking up if the older kids play rugby indoors.
Along with this article, it is important to mention (as many times as necessary) that doing insulation on your own, while possible, should always be done with the proper precautions and considerations. That is having the needed protection, and getting the area read for insulation.
It is always easier for either a neophyte insulation in do-it-yourself or a seasoned one to work with an already prepared area rather than start on bits and pieces of the area. If you toss everything into the wind and proceed without the proper first steps, you could ruin all the work, which not only means that you have wasted all the money and time invested, but also could cause a serious spike in your energy bill.
If the worst happens, you could end up with structural damage in your rooftop or the foundations of the house. It is a worse-case scenario, but that does not mean it does not happen.
How to start?
Think
Plan
Consult
Prepare
Do
Think
Before starting to consider what is it you need to achieve by insulating your ceiling? Do you want to make sure that the indoor temperature stays like it is for a longer time? Do you want to reduce your energy bills? Perhaps you want to make sure that there is no moisture, water vapor, mold or mildew growth in the crawl space in your ceiling.
These are valid reasons, however if yours is not listed among these, your own decision and wish are also valid reasons to insulate your home.
Now that you have decided what you need the insulation to do for you; the time comes to seek what kind of insulation do you think you will benefit more from. To insulate a ceiling, you can use different types of insulation, from loose-fill to paper faced insulation. It all depends on what it is you want to accomplish.
If you are uncertain what kind of insulation to use, check the rest of the articles in this site or leave us a line or two. I will delight us to help you find the perfect insulation for your needs and home.
At this point you also need to be truthful about your safety and the availability for you to access properly the ceiling. If it is hard to access, if you need special equipment it might not be the best idea to do your own insulation.
Plan
This is the second step in the process. It is now the time to decide if you will go on forward and install the ceiling insulation yourself or are you going to hire a contractor or an assisting guide.
Consider that while using some insulation types you can have a process that will be seamless, there are still things that can become bumps in the road and that hinder the easiness of the process. In addition, it is not a task that will take a few hours. Always consider that this process, regardless if it is insulating your ceiling any other part of your home, will take several days.
Next, if your ceiling has a crawl space, if it has electrical connections, lamps or any other electrical installation (even the cable from your local cable tv company counts) you need to be sure that these are properly installed and insulated by themselves.
Electricity in faulty wires can cause short circuits that can cause a fire with an electrical origin. The problem with these types of fires is that they are not easily put out. They require more experience and resources and can consume a lot more surface/areas before being extinguished.
The same applies if you have water or drainage installations in the attic. For all practical purposes, if you have any installations or cables running to and from your home through the ceiling, crawl space or attic, it is important to check them before starting with the insulation work.
Consultation
Keeping the number of a trusted insulation contractor, salesperson or even your favorite insulation manufacturing company is an excellent idea as they might help you out if at any point you face problems or bumps along the road.
Consultation is a tool that will come in handy not only during the installation process but also if accidents should happen. This is a step that, while it has little influence in the actual installation, is a process that I would not suggest you skip.
Prepare
Preparation is the next step in the doing process for insulation installation. While the installations in the ceiling, surrounding areas, attic or crawl space have been revised and corrected if needed. Now is the time to clean and make any other changes, modifications or corrections that need to be done before starting the insulation process.
Also take this moment to remove any fixtures, furniture and other movable objects that can become an obstacle when installing your chosen insulation.
If during the planning or the thinking stage you notice that in the ceiling or its surrounding area there is the unmistakable smell of mold or mildew, then it is now the time to have it corrected. Correcting problems of mold or mildew might take the longest time in the overall plan of insulating your ceiling. However, it is the best way to ensure that, at a later date, you will not be facing structural damages or health problems for you or your loved ones.
Do not correct the mold, mildew or water vapor related problems by yourself. Doing this on your own without the experience or the proper equipment will only cause a bigger problem and will not solve the matter at hand.
All the previous steps are connected between them. When you are checking the installations (water, electricity) of your home through the ceiling, it is also a splendid opportunity to see if there are any additional repairs that need to be done. One of the most common ones is wood replacement of the beams that support the ceiling itself.
What if I already have an insulated ceiling?
Sometimes homes have insulated ceilings already. It is always an outstanding idea to check the state of the already installed insulation every so often. Preferably with the change of the season. The reason for this is that in order to be efficient in checking whether there is a water leak from the ceiling onto the insulation, the raining season is the best time.
To ensure that there is no vapor condensation in the insulation, then the period of autumn and winter are ideal. It is during those times when you can verify if the heat from the home clashes with frigid air sifting through, causing water vapor or condensation to create.
During the months of spring is the perfect time to see if there is a problem with any potential condensation created during the months of winter. If so, you will see mold or mildew growing in the insulation and/or the house foundation structures.
Another thing to consider when you do all the preparations for insulating your home is to remove any of the old insulation that may linger in our home. Setting new insulation on top of the old insulation will cause problems as the fresh one will not hold properly and can easily come down or peel off the place whether it has been set up.
However, it is interesting to know that there is a difference of opinions regarding whether there should be a removal of existing insulation prior to installing new insulation. For many experts, there is actually no proper reason for the old insulation to be removed. These experts consider that, for the do-it-yourself homeowner, using the previously installed insulation gives them proper blueprints so-to-speak much like a paint-by-numbers project.
The opposing opinion states that, since the insulation has a viable life expectancy of 8 years, keeping it longer will only cause the insulation to degrade and that will give the new insulation an unsteady foundation. As I have mentioned earlier, it is expected for the new foundation to slip off and crumble if applied over old insulation.
Whether you decide to follow one approach or the other, something is for sure. The state of the previous insulation is what will give you the guideline to follow the first train of thought. If the already installed insulation is:
Faulty
Brittle
Decolored
Damaged
Has an appearance change, it can look like old cotton or worn out wool
Has a structural change it could slip or look shaggy
Smell funny or unpleasant
Wet
If you notice one or more of the previous changes, then you should NOT use the old insulation as a blueprint and install the new one on top of it. Depending on the type of change you might need to call a contractor, a plumber or a mold remediation crew to help you clean and clarify before re-insulating.
Materials and equipment to have.
Vapor barrier. This will come in handy, mostly. If your chosen insulation material does not come paper faced, then you might choose to use a polyethylene sheet.
Air seal. This is a complement to the vapor barrier. This will prevent any vapor that escapes from the home to not condensate.
Weather strip. This is a complement to the Air Seal, Just like the previous, it will prevent the frosty air of the environment from sifting into the house and condensate with any vapor that escapes.
Security equipment. Do not forget gloves, goggles and the air breathing masks. Even if you choose not to use loose-fill insulation, it is important to be fully protected.
One of the areas that has a higher risk of water-related problems is the attic. As the house’s roof stands on top of the construction and is exposed to all the elements, particularly the sun 24/7.
This causes the roof to absorb all the heat from the sun heating up the inside of the house. If there is an attic, and this attic is built independently from the rest of the house, then we have a situation where the coolness and cold environment of the home clashes with the heat wave that descends from the roof.
This can cause mold and mildew growth in this attic space. While maybe the mold will not pass or contaminate the rest of the home. It still is a potential health hazard as the air conditioner and all other air supply inside the home will become transportation vectors for mold and mildew spores.
The best solution is to provide insulation for the attic. Both in the attic ceiling and in the attic floor. With this insulation you can prevent the heat that comes down into the home from the ceiling and the sun exposure will not cause unwanted moisture as the coldness from the house rises into the ceiling.
In addition, the proper attic insulation will save you thousands in energy bills as you will not have leaking cool or hot air according to all the different seasons and climate changes a year has.
Can you insulate your own attic?
It is possible for any individual to insulate his or her own attic. It requires patience and effort. It is certainly not a 20-minute task and while the process itself is harmless; it is important to do a proper job otherwise you will need to take everything down and do it again.
With the consequential double cost.
Starting with the basic basics
The first step in all of this process is the decision making. What is it you need your insulation to do for you. In addition, you need to decide what type of insulation would you like, plan or be more convenient for you to use. Roll and Batt are some options.
The next step is to prepare the area to insulate. If you have things stored in that area, you will need to move them. It is always better to have a space rather than move everything, work a small area, and then move everything again.
Working on small areas at a time will only cause you delay, force you to work extra and it will tire you more and as a result, the overall work will be faulty and done poorly.
Besides this, if there is a need to change, correct, alter or even finish the attic space in your home, then this is the right time to do it. You should not insulate an attic that hasn’t been finished. Unfinished and raw materials will react badly as they are exposed to the elements and in consequence, they will cause additional problems, work and expenses.
Remember that doing your own insulation work means that unless you have a construction company or some experience in the field, you will need to be extra attentive to detail. At all times when doing the insulation remember to wear the protective gear is to be used: gloves, eye protection and a clean particle mask.
Particle masks usually have detachable filters. It is important to keep the filter clean as that will allow a proper protection and will make it easy for you to breathe.
Information you need to know before you start
R-Value is the amount of insulation that any given material will yield once properly installed. Here, a higher “R-value” will give a more effective insulation.
There are four commonly used types of insulation:
Spray foam
Loose fiberglass
Cellulose
Fiberglass batts
Spray foam is considered the most effective and the easiest to apply. It comes in a spraying can that will shoot the foam much like an airfreshner will do. Once sprayed it will begin to solidify and will complete its solidification in about 24 hours. At that point, removing it is difficult and requires experience.
The difficulty and dexterity required to use the spray foam insulations makes this type of insulation the least adequate for neophyte do-it-yourself home-owners. It is always recommended that this insulation is installed by a professional.
Loose fill-insulation
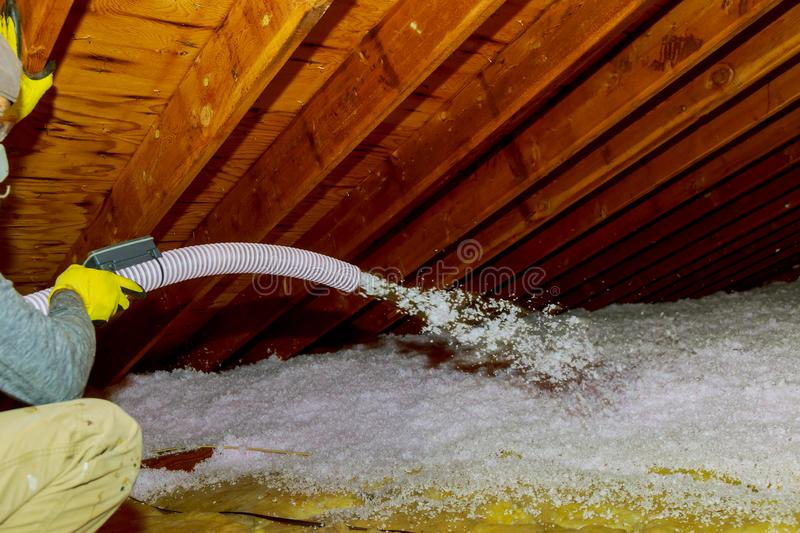
This particular insulation comes in three varieties: Fiberglass, cellulose and mineral wool. Of these three, it is likely that cellulose is the most effective and environmentally friendly in all situations. With loose-fill insulation, though it can be installed by hand without a loose-fill blower, it requires more work and attention to detail as the spreading of the material should be done evenly.
If you want to give it a go, begin filling the areas between joists, from the wall to the center of the attic room and from there to the entrance of the room. Remember to be mindful about ventilations and electrical installations.
Despite what many believe, spraying loose-fill insulation is not a task that a single person can do. Regardless if they are doing it by hand or with the help of machinery.
Loose fiberglass
This is applied by a machine that “blows” it much like a fake snow machine. This is one of the favorite insulation materials for homeowners who like to do things caring for the environment. Particularly so because most of the loose fiberglass insulation comes from recycled and left-over fiberglass materials from other forms of insulations such as rolls and batts.
The problem with this type of insulation is that it needs to be evenly distributed to be successful at its insulation purpose. Additionally, it is important that you keep the safety gear on when applying. If you have no experience in insulation installing, it is probably a superb idea to hire a professional or have a consultant for this matter.
Cellulose is another choice for homeowners who like to go green. They make this insulation from recycled grounded paper, which is then mixed with boric acid and two other chemicals that will avoid insect population and provide fire resistance to the material.
Besides this benefit, the cellulose insulation’s thickness is a brilliant choice to ensure that the insulated area will not leak energy controlled air.
It is important to mention that neither cellulose nor fiberglass nor any other form of insulation is fireproofed. They will undoubtedly burn and be consumed by fire; what they are is fire resistant, this means that they will not burst into flames when briefly exposed to fire.
Therefore, it is important to have your attic and any other part of your home checked for fire hazards.
When you use cellulose as your chosen insulation material. You can properly install it in your home with just an insulation blower. Just like with the loose fiberglass insulation, the trick with this type of insulation is that you need to make sure it is evenly spread.
It is not as delicate as the loose fiberglass, but just as with this one, it is important that you keep using the protective gear.
Fiberglass Batts
The last one, fiberglass batts is considered as the easiest ones of the many insulation presentations available for all do-it-yourself homeowners that need to insulate their homes.
Since fiberglass batts come in pre-set segments, they are easy to install and if you need to trim them down; they are easy to cut down.
Most of these insulation presentations have very affordable prices and can be acquired from several vendors. Some of which will also be able to deliver them directly to your door.
Now that you have decided on what type of insulation to use, what’s next?
As I have mentioned, and regardless if you are planning on hiring a professional or doing the insulation yourself. It is always better to have an empty space to work in rather than having to move lots of things around.
Check that there are no air leaks that come from structural problems in the attic.
Sometimes a construction settles down and there are minor cracks happening specially where the bricks join. Concrete sometimes cracks after many years since it has been settled for the first time. These cracks can sometimes also provide air leaks that should be plugged and resolved before starting with the insulation installation.
When an attic is properly sealed, the insulation that is placed will maximize the effort and the energy bills will be considerably reduced. Some areas that are often overseen and that might cause all efforts to go in vain are:
Attic doors
Pull-down stairs
Chimney spaces
However, do not forget to check these other areas, if your attic has them:
Windows
Cable installations (any cable that comes from the outside and has an entry point in the attic. Many TV cable companies do this)
Once any potential or known air leaks have been successfully neutralized, then it is time to ensure that any moisture that forms in the attic has a proper way to escape. When moisture or ice are allowed to build up in the attic, there will be damage to the roof and walls of the home structurally as well as the development of mold and mildew as we have discussed before.
The way to properly ventilate and attic is through attic-ventilation systems, these could be soffit vents or ventilation chutes. If you are not sure if your attic has any of these, you can contact a local contractor or your trusted insulation provider.
Next on the list are potential problems that can cause serious damage and put your life at risk: Fire hazards. Make sure that any electrical installations and flammable services such as gas installations are properly set up and isolated.
Also consider any light fixtures. If your attic has been set up as a living space, it is also important to check outlets and recessed lights. If it hasn’t been set up as a living space, recessed lights should also be taken care of.
When you start your insulation process, make sure that any insulation you install is kept a few inches away from all lighting fixtures, this will prevent excessive heating and bursting into flames and short circuits.
Here, it will benefit you to hire a professional rather than do it yourself, especially if you have no previous experience in taking care of fire hazards or electrical installations.
Whatever money you might think you are saving is money you are actually risking when leaving faulty wiring exposed or improperly isolated.
To the everyday person, a home would have only one ceiling: The rooftop, right? But this is not entirely true. Each room in your home has a ceiling and a floor… Even the basement and each one of those has a different insulation need in comparison with the rest of the house.
Regardless of how many rooms are there in the house, one thing is certain, there is no better place to insulate than the rooftop of the house. This is where all the warmth or coolness of the home can escape more easily. Starting from the roof down is where you ensure that you will have insulation that will render optimal energy efficiency.
However, it is important to remember that just like with any other home-based activity, you should never “plunge” into it without care nor consideration of the many things that you need to correct, or check that they are correct or to replace before insulating your ceiling. Failure to do so can hinder your effort, render you at a monetary loss as the job would have to be re-done or even risk your home to an accident because of improper insulation.
Taking the time to consider, supervise, check, and repair (when needed) will only help you develop a proper strategy and maximize your effort by cutting down on time invested and even money spent.
How To Insulate Ceilings
When you set up to insulate your home’s ceiling; there are a few things that you need to consider before thinking about taking this task on. One of such is the ceiling that your home has.
The second thing that you need to consider when deciding on insulating your home’s ceiling is the accessibility to the ceiling. As a do-it-yourself person, you most likely do not have the equipment that a contractor usually has, staying safe is–and should always be your priority.
In the USA, most homes have accessible attics whose entrance is through an interior ceiling hatch. There are other homes that have an exterior roof or entrances that are mounted in their walls. The main problem with these entrances is the size and whether they are big and wide enough to let you pass through all the materials, you will be needing.
Gable-end entries are ideal as they are one area that you need not insulate with the additional plus that–if needed, they are a great entry point for firefighters. None of us plan to get our homes burned down, but accidents happen and it is always best to be safe.
While you are reviewing and checking the access and the space you have in which to enter your insulation materials; it is now a good opportunity to check:
Obstructions
Ease of movement
Vertical clearances
The condition of the roof framing
The condition of the sheathing
How is the finish
Make sure that neither the soffit nor the fascia has signs of moisture-related problems: leaks, stains, mold, flaking, mildew, or rot.
If you find any of these areas with even the slightest problem, it is in your best interest to have them corrected before you launch into setting up or replacing the insulation, you will face a myriad of problems and all your hard work will be for nothing as the efficiency of the insulation will be 0.
In addition, you need to consider that some of these problems can cause rot in the wood that supports the attic. This could lead to even more problems and even structural ones.
If you see moisture-related problems, these can come from the outside and sift in.
Moisture can also come from inside the house in the form of vapor by air leakage. The main areas that will show this problem if this is the cause are Kitchen and Bathroom.
How can you tell for sure you have air leakage in your attic? Because you will find discoloration of the insulation. Check existing insulation so you can pinpoint and locate any air leaks. These are areas in which you will need to be extra meticulous.
Ok, but is there an ideal time to do so? Cold snaps are a perfect time. This will take the form of frost in cold climates. While this is somewhat expected, see nothing ranging between 2 inches or more.
For this check to be efficient, make sure that the ventilation is free. It should not be blocked.
If you want to check for moisture, do so during the raining season.
Replace, Remove or Add
Some experts consider that the existing insulation (if there is any) is perfect to lay new insulation over it. In this manner, you will already have “the blueprint” where to place the new insulation. This might be handy if you are a do-it-yourself kind of person.
Other consider that this is a bad idea, particularly since insulation usually is efficient for a period no longer than 8 years. It might be better to replace the whole thing.
If the insulation is decolored, damaged, brittle, or has any change in its appearance or structure, the best and safest bet is to replace it. If it is wet, you need to correct the moisture source before installing the new insulation.
Depending on the source of the moisture you might need to call a roofer or work on your roof directly. It is important that you fix and resolve the moisture or vapor problem. As even with water-repellent insulation, there might be mold or mildew if not in the insulation, it can grow in any of the other attic elements such as the wood that makes up the soul of the attic.
Things you SHOULD have when insulating your attic:
A vapor barrier on the warm side of the insulation. In previous times, this was done with paper-backed batts or even layers of paint. Nowadays the choice is a polyethylene sheet.
Air Seal the attic to prevent outside so that any vapor that can escape to the attic does not condensate and cause problems.
Weatherstrip to enhance the air sealing.
Safety notes:
With the following items, always contact your contractor or insulation specialist as they require special actions regarding attic insulation.
Metal Chimneys. Should be at least 3 inches away from contacting any insulation.
Electricity. Before working on the insulation, turn off the general power for your home or area where you will be working. It will always be advisable to stop and consult a specialist if you notice faulty or suspicious wiring.
Animal droppings. These signal three things: Wildlife nesting in your home, in which case you need to call a relocation service. Harmful vermin infesting your home, in which case you will need to determine exactly what the vermin is and call an exterminator. Finally, it might just be that there was an infestation or nesting at some point but not anymore, in which case you should try to figure out which one it was and if it was nesting, prevent it from happening.
It is also important not to remove the debris by yourself as there might have bacteria and viruses that can be harmful to human beings.
Insulating Drop Ceilings
There are homes that have two ceilings. A secondary one that is laid down below the main ceiling is known as a drop ceiling, false ceiling, or suspended ceiling. It is normally used to conceal pipes, wiring, and/or ducts.
Drop ceilings are usually created to enhance or make the most out of the thermal-efficient system you have in your home. Therefore, it is important that you insulate them properly.
They are also used when there is a cathedral ceiling or when otherwise the normal building structure demands a drop ceiling to further control the temperature inside the home in a more efficient way.
There are many preferences for the way to insulate a drop ceiling and what products to use. In most cases, it usually depends on the experience of the constructor or renovator. Yet, fiberglass batt insulation is the perfect insulation for these types of ceiling. Their efficiency in insulation while being light and easy to handle and install makes them the ideal insulation for drop ceilings.
While there is some debate on whether mineral wool batts are light enough to do the job without adding too much weight to the drop ceiling structure and with the efficiency that is expected from them. It depends on what is it you expect to achieve from the insulation. For instance, fiberglass is perfect to care for the investment in climate control systems such as heating and air cooling, but mineral wool has a voice of its own for soundproofing.
Many specialists believe that insulating a drop ceiling is the easiest insulation task that a homeowner can do when they are starting on the do-it-yourself world. If you are among the homeowners that fall into this category, always consider that regardless of the insulation that you use, it is best that you use batt insulation rather than roll.
This is because the space (if any) in the drop ceiling is too short to maneuver safely. The R-value that you will need for this job depends on what you want to accomplish and the overall weather in the location where you are at.
If you are not sure what R-value you should consider, contact your insulation specialist for guidance. Once a decision has been made, it is important to check on the structure of the drop ceiling so that when you are moving it about installing the insulation, the constant movement does not cause the drop ceiling to fall down.
The way to tackle the insulation depends on you and the way the drop ceiling has been built. A traditional way states that you will take the ceiling panels down to install the insulation batt and then put them back in their original place.
This process is long and it can be tedious. A modification from this traditional method states that you process each row of panels.
· Number the panel rows: 1,2,3,…
· Remove the panel row: 2
· Work on panel row 1. Install and secure the insulation.
· Place row 2 back in its place.
· Remove panel row 3
· Repeat the process until completion.
In this process, you will still have some difficulty installing the insulation for the last row.
Regardless of which way you go, you will still need to consider things that can be a potential hazard such as electrical installations and other installations.
Insulating Cathedral Ceilings
As its name states, a vaulted ceiling has an arched structure with one or two sharp, sloping sides that together form a peak. When one of the two sides has an unequal length, it slants to the lowest wall, and this creates an illusion that it might be bigger than what it really is.
This makes slanted ceilings part of cathedral ceilings. A cathedral ceiling besides the elements already mentioned has a center point that IS higher than the walls, its sides are of an equal length that meets in the middle of a room and it gives it a unique shape.
Vaulted ceilings and cathedral ceilings might seem similar, but they are not as cathedral ceilings do not admit as much “play” as vaulted ones.
As with any other ceiling insulation, working on a cathedral insulation is the same. There are many alternatives for insulation. Many of them present problems as this ceiling has a unique shape and therefore a set of problems of its own.
Using cellulose insulation, for instance, can cause leaks as the best way to apply cellulose insulation is wet and as with any other paper, once it dries, it shrinks making it a false reading. This means that once you have installed this insulation, it will settle down and cause crevices and drafts, leaving your work to be for nothing.
In addition, and probably the most important thing: Cellulose will react badly to water and of thumb, it is not fire retardant. Cellulose can absorb a lot of water, and that will make it heavy and cause additional weight to your cathedral ceiling. If it gets wet, it will take a long time to dry out leaving plenty of room for mold and mildew.
Another alternative that is commonly used is spray foam. Also known as open or closed insulation foam; this name references to when the bubbles in the foam burst, whether it is when spraying it or after it has dried. Spray foam is expensive and sometimes, they have a heavy odor that can demand the people that live in the homes to leave for some time while the odor dissipates.
Finally, it is an insulation that admits no error. It is not insulation that the do-it-yourself homeowner can take care of. If it is not properly installed it will leave gaps that will render the whole work pointless.
Fiberglass has an easy installation process as all it takes is for it to be stapled to the underside of the roof before hanging in place the drywall.
This is a more financially friendly option. Glass does not shrink, and it absorbs no water. It is also known to be fire retardant and since depending on the manufacturer you can find this insulation with or without backing, then you can have double-efficient insulation and install it in one process instead of going over the whole work twice.
As always, if you are not sure what type of insulation benefits your cathedral ceiling the most, reach out to your insulation specialist for guidance and consultation.
Insulating Ceilings with Attics
Not all homes have attics, some do. When your home has an attic, a question comes to mind. What to do when the ceiling of your home is the floor of the attic? Many people leave the attic un-insulated. One clear example of this attitude lies in the US classic movie: National Lampoon’s Christmas Vacation , in this movie, the main character played by Chevy Chase climbs up to the attic to hide some Christmas presents.
Since the attic is not insulated, a cold current runs through the house from the attic’s open door. His mother-in-law closes the hatch and leaves Chevy Chase “locked” in the attic. Again, since there is no insulation, he is cold and has to resort to clothes layering to keep warm.
You can see the character as he “walks about” the attic from beam to beam, trying not to step over the insulation. This is probably the best example there is for you to get convinced that it is a good idea to insulate the attic.
But why didn’t the character insulate the attic? The reason is simple, to keep your energy cost as little as possible, then you need to keep the protected volume (the area that receives the heating/cooling processes) as small as possible. And in most cases, insulating the attic can be unbalancing this structure.
However, you need to consider what use are you giving your attic? Even if you plan on using it for storage, consider the state in which the items stored there will be. An un-insulated attic can draw moisture and therefore mold and mildew that can not only damage the beams of the attic and the structure of the house but also anything you store in it.
Therefore, the best alternative is to insulate the whole area. Both the floor and the underside of the roof of the house which is the attic’s ceiling. This will keep the heated/cool area small enough to keep the energy costs low, but it will prevent any outside weather from sifting in.
Traditionally, cellulose is the insulation of choice for this, but there are many problems with it:
· It is not airtight, and it allows air to flow through, therefore it is not the perfect match to help you save money with your energy bills.
· As we have mentioned, it can absorb water and become even heavier. This could have a negative impact on the structure and stability of the ceiling.
· It is not fire retardant.
On the other size, fiberglass has some problems of its own, though despite them it is still the best alternative for the insulation of the entire attic space. As it is lightly weighted, it does not absorb water and is fire retardant
Insulating Ceilings without Attics
Insulating the under-roof of your home is a definite must if you want to use your financial resources in the best and most intelligent way.
Johns Manville R38 16 Unfaced
Flat roofs or roofs that have no attics should be insulated from above so that a layer of rigid insulation can be added over the weatherproof layer or directly on top of the timber roof surface. In this latter case, the weatherproof layer will be applied later on top of the insulation.
If you are not building a home but renovating, it will be needed for you to remove the covering of your roof, whether you have tiles or any other covering as the process is elaborated, it should be carried out by a professional.
Not only because of the elaborated process but also so that the whole structure and the insulation itself complies with building regulations both local and federal.
Yet, there is another way which will mean to install the insulation underneath the roof. Otherwise put from inside the house; still, this process should not be carried out by a do-it-yourself.






 , in this movie, the main character played by Chevy Chase climbs up to the attic to hide some Christmas presents.
